
Fixing A Broken Laptop
Fixing a broken laptop, Laptop computers have largely replaced desktop machines in many people’s homes and workplaces. They offer numerous advantages in terms of required space, power consumption and heat generation, but they’re a lot more fragile.
How it works
Laptops are functionally just like desktop computers, except that everything is much smaller and runs on less power, and the LCD monitor is built into the unit. Also, laptops incorporate power management systems for efficient charging and use of batteries, and their AC power supplies are not internal, except on some really old models.
Laptops are enormously complex, with most of the circuitry on the motherboard. That board has many layers and lots of LSI chips, along with a zillion tiny support components crammed together.
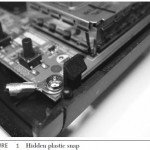
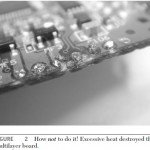
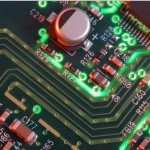
Some of those huge chips are connected to the board with a ball grid array, or BGA, which is a bunch of tiny, ball-shaped contacts soldered to pads underneath the chips. If you see a chip with no leads, it has a BGA. See Figure 1. BGAs provide hundreds of contacts in a small space, so they’re used for microprocessors, video graphics chips and other very high-density devices. Some of those items run pretty hot, unfortunately, and can degrade their solder joints with flexure of the board and time, resulting in intermittent connections and a machine that keeps crashing.
How To Fix Laptop Common Errors
Before fixing a broken laptop, You need to know how to open the case without breaking it, and reassembly it later. Let’s look at a few common laptop problems and how to approach their repair.
Laptop Crashes
If the machine works but crashes randomly, pull the RAM modules and use a dry swab to clean their contacts on both sides. Even if they’re gold-clad, which most are, the swab may show a surprising amount of grayish dirt when you’re done. Pop the modules back in and test.
If that doesn’t solve the problem, use diagnostic software to check for a bad RAM module. If one comes up as bad, replace it. That’s about all you can do. RAM is pretty reliable, but it does fail now and then. Some motherboards have RAM soldered on, with modules used only for expanding the memory above the stock configuration. If the motherboard RAM is bad, you’re pretty much stuck. If it’s an especially expensive laptop, you might be inclined to try replacing a RAM chip, but the size scale makes soldering difficult. Some of those chips aren’t so tiny that it’s impossible, though.
If the machine crashes so often that you can’t even run the software, check for bulging or leaking capacitors on the motherboard.
Some laptops crash after they warm up. Usually, that means a bad chip or an intermittent solder joint, probably in a BGA somewhere under the microprocessor or the video graphics chip. I’ve seen hard drive controller chips do that too; the machine works fine until that chip warms up enough to malfunction, and then it won’t read the drive or it corrupts the data.
Charging Problems
If the battery won’t charge, check first to see if the battery is any good. The cells’ chemistry wears out eventually. Also, the internal charge control circuitry can fail. Sometimes a battery stored so long that all of its charge has leaked away may refuse to start up because its internal micro won’t signal its existence to the laptop without at least a little power to run. Some systems offer a battery resetting utility that can hunt for a dead battery and try some charge to see if it’s there and working.
Short of cracking the battery open and applying a little charge directly to the cells, there’s nothing you can do. And, frankly, I don’t recommend doing that. It’s rather difficult to accomplish without wrecking the battery, and the lithium-ion cells inside are pretty dangerous if a screwdriver pierces them while you’re breaking open the plastic casing. Any breach of their seals can cause a fire hazard because lithium reacts violently with water, including water vapor in the air. Unfortunately, applying power to the pack’s outside terminals won’t work; the charge controller inside allows connection to the cells only when the laptop gives it the go-ahead.
If you’re sure the battery is good, check to be sure the power supply is working! Many times the adapter fails, and it’s just assumed that the computer is the culprit, when in fact it’s not getting any power. If the adapter has an LED, it should be lit. Those LEDs are pretty much always driven by the adapter’s output. So, if the light comes on at normal brightness, the supply is working. If it doesn’t light up or is very dim, unplug the adapter from the computer and see if it comes back to normal. If so, there’s a short in the computer dragging down the voltage. If not, either the supply is dead or its output cable has a short. I’ve seen that happen a few times, and repairing the cable restored normal operation, thanks to protection circuitry in the supply that prevented its destruction or a blown fuse from overcurrent.
Once you’re sure the supply works, check for a jack issue on the laptop and in the supply’s plug. Does the jack move when you wiggle the plug? Does indication of charging come and go when you do that? If you’re watching for software indication of charging, remember that it may take 10 or 20 seconds for the operating system to recognize the change. Lights on the battery itself, if there are any, are a far better indication of whether it’s receiving voltage. Even those may take a few seconds to respond, though, so wiggle slowly.
To ascertain whether the trouble is in the plug or the jack, hold the plug steady with one hand while moving the wire with the other. If the connection cuts in and out, the plug’s the problem. If not, it’s the jack. You may have to do this a few times to be sure, because it’s easy to move the plug slightly in the jack while trying to hold it still.
When you’re sure the power supply, jack and battery are okay, it’s time to consider a motherboard problem. Power management on laptops is complicated, involving firmware (software encoded onto the machine’s chips), system software and the power management unit, a specialized microprocessor used only for controlling the flow of power to the various parts of the machine. A problem with any one of these could prevent charging. If there’s a reset procedure for the power management unit, try that.
If nothing works, open the machine and look in the area of the battery connector. Because significant current of up to several amps gets passed in charging, the power transistors controlling it are usually located near the connector to avoid having to waste space with wide circuit board traces that can handle the juice. The transistors could be on either side of the board. They’ll be bigger than most of the components around them. Use a shield or other obvious ground point, like a chassis screw obviously connected to a wide trace on the board, for circuit ground. With the AC adapter connected, try scoping the transistors’ terminals while you insert and remove the battery. If you find one with constant voltage on one terminal and a signal that changes state on the other when you pop the battery in, but nothing shows on the third terminal, the transistor is probably open.
Display Problems
Unlike a desktop computer monitor’s DVI (Digital Video Interactive) or VGA (Video Graphics Array) connection, the interface from a laptop’s LCD to the motherboard is specific to the particular make and model. Signals may be carried on a bundle of wires or a printed-circuit ribbon cable. Ribbons rarely break from normal flexure, although some get brittle after a number of years. Who keeps a laptop that long anyway? Wire bundles do break, resulting in all kinds of display symptoms.
Far and away, loss of backlight is the most common display failure. If you can boot up the machine normally and see the image on the screen by shining a bright light on it, the backlight has died. The three main causes are motherboard failure, cable breakage and a blown inverter. The fluorescent lamp may have broken if the machine took a fall, but that’s less common.
This assumes there is a lamp. Even in newer laptops using LED backlighting, though, operation still depends on functioning cables from motherboard to screen.
With the laptop running, gently move the screen back and forth through its entire range of angles. If you see even a flicker of backlight, the problem is almost certainly in the inverter’s cable. Most inverters have at least five wires going to them, and sometimes more. Usually, there’s +5 V, +12 V, on/off control, brightness and ground. Brightness is set by varying the duty cycle of a fast square wave. The higher the brightness, the longer the waveform stays up during each cycle. That arrangement allows the motherboard to control the brightness in purely digital fashion, with no varying analog voltages. If the wire breaks, though, the inverter will go dark, even though all other inputs are working. In fact, some models omit the on/off control wire and just turn off the pulse train to shut down the inverter when you close the screen or set the brightness to minimum. Loss of any of the other wires will kill the backlight too, of course.
Inverters work hard; most the warmth you feel along the bottom edge of a laptop’s screen comes from the inverter’s output stage. So, as you might expect, the transistors blow. That’s especially likely when the screen has been run at full brightness for a few years. The heating and cooling cycle eventually kills those transistors.
Unlike desktop displays, laptops usually have only one lamp and one inverter. Open up the screen assembly and you should see it. It’ll look just like the ones in desktop LCDs and TVs, only smaller. It may be covered in tape or with a shield. Very close to the inverter’s input connector (not the two wires going into the screen—that’s the high-voltage output for the lamp), you’ll find a fuse soldered to the board. With power disconnected, check it with your DMM. If the fuse is open, either the inverter has blown or the lamp is broken inside the LCD. Unless the machine got dropped, assume the inverter’s output transistors shorted and blew the fuse. As described earlier, you can try replacing those, but they’re hard to get. The easiest route is to replace the entire inverter board. Some manufacturers won’t even sell you an inverter; they want you to replace the entire screen assembly, which probably costs more than the laptop is worth. Check eBay and online parts houses for good deals. The first time I ran into this problem, I opted against the manufacturer’s $700 screen assembly replacement and found a new inverter online for $40. It worked just fine.
If the fuse is still good, a problem with the inverter is less likely. One of those pesky transistors could have opened and not blown the fuse, but they usually short. The cable may be broken, even if the swivel test didn’t turn anything up, or there could be a serious motherboard problem like a bad graphics chip or a broken BGA connection. Try pressing on the graphics chip. If the light flickers on, the machine crashes, or any other changes occur, there’s your answer: its BGA is intermittent.
Testing the cable isn’t hard. Unplug it at both ends and use your DMM to check for continuity. To get a connection to those tiny holes in the connectors, connect a clip lead to a small component from your stash and push its lead into the connector, with the other end going to the DMM. Needless to say, you want to insert the same end of the component to which your lead is clipped! Just let the other end of the
part hang.
If the cable is good and the inverter’s fuse is good, it’s likely the motherboard isn’t turning the screen on, and you’re probably not going to be able to fix it without replacing the board. A lot of laptops get dropped or otherwise abused, and people sell them off for parts when the screen is cracked. The motherboard rarely gets damaged in a fall, so you may be able to scare up a parts unit online and swap out the boards. Just avoid buying any machine that’s had liquid spilled into it.
If the screen lights up but the video isn’t normal, plug an external monitor into the machine and see if video works properly on that. If not, the motherboard has a serious problem at the graphics chip. If it looks okay externally, either the video cable or the screen itself is causing the trouble.
A single bad line on the display cannot be the fault of the cable, because no one wire is specific to such a small area of the screen. A bad line or two is caused by the row and column drivers inside the LCD or their connections to the glass. You can’t fix this, but finding a reasonably priced replacement screen online is easy enough for many laptop models. Changing it is entirely a mechanical job; no soldering will be required. Take apart the screen bezel, get the LCD in the frame, plug in its connector and you’re done. You shouldn’t even have to open the main body of the computer.
When video is severely distorted, with large areas of the screen a total mess, suspect the cable or the graphics chip. A bad screen can cause this too, but it’s less likely unless you see obvious cracks from a fall. I once worked on a laptop with video that started shaking back and forth after it had been on for about half an hour. Eventually, the image would tear, looking a lot like an analog TV with its horizontal hold misadjusted. I proved the fault was with the graphics chip by spraying component cooler on its heatsink. As soon as the chip cooled even a little bit, video returned to normal for a few minutes, until it got hot again.
Before you give up, check the video cable the same way as with the inverter cable. A broken connection there will cause absolute havoc on the screen. Also, some LCDs have thin circuit boards on the back, with ribbon cables connecting them to the row and column driver chips along the screen’s edges. If they use sockets, check the fingers on those cables to be sure they’re not oxidized. Clean them and test the screen again. Beware the thin, printed conductors wrapping around the edges of the screen! Those are the connections to the drivers, and they’re especially fragile because of their density. Pressing on one is likely to ruin the LCD. Keep that in mind when installing a new panel, too.
Drive Problems
There is an issue with some brands of drives, especially after they’ve been in use for a few years. The contacts from the board to the head assembly inside the metal casing get oxidized, causing read failures and sometimes severe data corruption. For some reason, laptop drives seem especially susceptible to this problem. If yours is recalibrating a lot, having trouble reading and returning errors, it’s worth taking it out and trying the procedure described in that section.
The 5 VDC power to the drive needs to be quite steady and clean for the drive to function properly. Drives pull up to 500 milliamps, which is not insignificant. If the motherboard’s electrolytics are starting to get weak, the voltage may dip or develop spikes when the drive turns on, making it corrupt itself or causing malfunctions in other areas of the board. As the drive spins up from a dead stop, current draw can be a full amp for a second or so. See if malfunctions occur at the moment spinup begins. If so, suspect voltage regulation or bad caps on the motherboard.
The optical drive eats around the same amount of current and can cause similar trouble. The information in the section on CD and DVD players, also in this article, applies to computer optical drives as well. In particular, the problem with oxidized ribbon connections to the laser head occurs more often in these drives than in shelf-style DVD players. If the drive has trouble reading discs, try cleaning the lens and the cable contacts. Very often, that’ll bring it back to health.
Other Problems
The Wi-Fi antenna cable on laptops with internal wireless cards goes through the hinges, with the antenna in the screen assembly. A broken coaxial cable will cause severely reduced wireless range. To check the cable, unplug it from the Wi-Fi card and use your DMM. Many machines have two antennas, with a small duplexing board
in the screen assembly, so you can’t test from the card end of the cable right to one of the antennas. Be sure to check from the card connector to the duplexer. If you follow the cables from the antennas, which are little flat things next to the screen, they’ll meet at the duplexer. The third cable, going down to the hinges, is the one you want. Test from its solder contact on the duplexer back to the other end inside the main body of the laptop. Be sure to check both the shield and the center conductor, as either or both could be broken. Usually, it’s the center conductor that breaks.
Laptop keyboards are mostly mechanical, with a conductive rubber button under each key. The connections are arranged in a grid, but the irregular layout can lead to some pretty obscure patterns. You can’t assume that it’s all rows and columns.
When one key stops working, it’s a contact problem underneath. Time and oxidation can do it, but more frequently someone has spilled liquid into the keyboard. If you’re really intrepid, you might be able to take apart the keyboard and clean it out, but it’s a lot of trouble, and keyboards for most machines can be had pretty inexpensively. Replacing one is just a matter of popping it off, disconnecting the ribbon cable, and installing the new one.
If a whole bunch of keys dies, and there hasn’t been a liquid spill, check the ribbon cable connections at the motherboard, because one entire line may be out. If not, there could be a motherboard problem with the keyboard decoder. Or, the break might be in the keyboard.
To check it, remove the keyboard and do a continuity test on every combination of lines coming from the keyboard, keeping in mind that good contacts may show as many as a few dozen ohms, as is normal for conductive rubber switches. There aren’t that many lines, perhaps six or eight, so the test isn’t that rough. If a bad key produces no continuity on any combination, the keyboard is the problem.
If the machine goes nuts, acting like someone is typing the same key over and over, that just might be the case! That “someone” was the person who spilled coffee or soda into the keyboard, shorting one or more of the contacts with conductive goo. Disconnect the keyboard and fire up the machine. If the stuck key goes away, you know somebody got sloppy with the drinks. This happens quite often, and the poor computer will act like it’s mondo loco, when all it really needs is some peace and quiet from its keyboard connector.
You May Want to See :
-
 Building Your Jukebox to Your Own Design
-
 Opening An Electronic Circuit Without Breaking
-
 Remove Components From Circuit Board
-
 Tinkering With Portable DVD Players
-
 How 3D Printing Pen Work ?
-
 GAW Miners Hashlet
-
 3 Types of Drones: RTF, BNF, and ARF
-
 Repairing Noisy Notebook Fan
-
 Tinkering With Digital Cameras
-
 Reassembly Circuit Board
-
 4 reasons to keep a home phone
-
 How to Build a Jukebox
-
 Own Made Automotive Diagnostic
-
 ASUS ROG Rampage V Extreme
-
 Metabox Prime P650SE
-
 Recognize Major Feature of A Circuit Board
-
 Make Your Own Fish Tank Monitor
-
 Storage Upgrades, Advice For Businesses Of All Sizes
-
 Top 3D Printers Budget Options
-
 Sensor and Alerts For Fish Tank Monitor
-
 How to Build an Audio Level Controller


