
Making Compressed MP3 Files from CDs
The following three steps convert a CD to MP3 files. Some software, including the MusicMatch software we describe in before, combines or simplifies these steps.
Create an MP3 File
- Name each track on the audio CD. You can do this yourself, typing in the track titles manually, or you can load the names from an album database service on the Internet.
- Copy the digital music data from the CD, putting the data for each track in a separate file on disk. For convenience, you’ll want to name each file with the name of the track developed in Step 1. This step is called ripping the songs from the CD, and results in files with a .WAV extension.
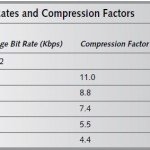
- Set up the conversion parameters for your MP3 compression software, which may include only the bit rate, and run the compression.
MusicMatch does this all in one step—configure its settings once, then simply insert a CD, select the tracks you want, and click Record. MusicMatch finds the album title, artist, and track title, then does the work. Converting a complete CD (Meat Loaf, Bat Out of Hell) took less than 12 minutes to rip from a Toshiba SD-M1212 DVD-ROM and encode at 256 Kbps on a Pentium III at 933 MHz running Windows 2000 Professional. CPU utilization ran 10 to 15 percent, so the drive speed was the limiting factor rather than the processor. Overall, the drive ran at about 4.8X while we did the conversion; when we later upgraded the software to the paid version, MusicMatch Plus, which advertises faster conversions, we saw drive speeds as high as 5.9X, reducing the conversion time correspondingly.
You should think about how you’ll organize the MP3s on your disk before you start ripping and compressing with MusicMatch. A mere few hundred CDs will turn into thousands of MP3 files, and if you simply give them random names and throw them all in one directory, it’s going to get hard to find anything at all.We’ve typically organized all the files for one album in.
their own directory; with MusicMatch, it’s easy to collect album directories themselves into directories grouped by artist. You don’t have to follow that scheme, of course, but you’ll want some organization.
Here’s how MusicMatch works. Download and install the free version from the MusicMatch Web site at www.MusicMatch.com/download/free. Once you complete the installation, start MusicMatch, click Options, and then click on Settings (see Figure 2-2).

The Recorder tab settings in the dialog box (see Figure 2-3) control what you get when you rip a CD and convert its tracks to MP3 files. Figure 2-3 shows how we set it up, including how we set the custom quality settings to convert to MP3 at the 256 Kbps rate. The MP3Pro format (available in the recording format dropdown) gives you better sound for the same data rate, and can be played back by MusicMatch and WinAmp, but isn’t likely to work if you want to record an MP3 CD or DVD for playback away from your computer.
The Tracks Directory button gives you a dialog box (see Figure 2-4) that lets you automate creating a well-organized directory structure with fully descriptive file names. Figure 2-4 shows that we’ve set up MusicMatch to put all the automatically created directories under two subdirectories, and shows at the bottom a sample of what a complete path with file name looks like.
If you set up the directory storing all the subdirectories and files to be shared to the other computers
on your LAN, each computer can play songs from the library.

Once you have the setup done, the actual conversion is trivial—simply put the CD in the drive, let the song titles download from the Internet, click on Record, let the recorder window open, and click on Record in the recorder window (see Figure 2-5). If you want to convert the good tracks only (yes, we know, they’re all good), just uncheck the ones you don’t want before clicking the final record.
With that, building your MP3 file library is just a matter of feeding CDs into your computer any time you think of it. You can even play back already-converted files while converting new ones.
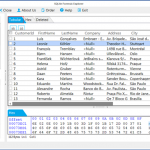
After you’ve converted a useful number of CDs, you’ll want to start building playlists, which are simply lists of songs selected from your library. MusicMatch lets you sort your library display by many more features than we’ve shown in Figure 2-6 (album, artist, artist Web page, audio file Web page, bit rate, commercial info, data added to library, genre, mood, preference, situation, file name, file type, track title, tempo, time, track number, and release year), giving you good tools to find and select specific songs. Once you select the songs you want in your playlist, empty the playlist window with the Clear button, then right-click in one of the selected items in My Library and add the songs to the playlist window. Continue adding songs to the playlist window.When you’re done, right-click on the top of the playlist window and save the playlist.
You May Want to See :
-
 Sound, Compact Disc, and MP3 Compression
-
 Why is Exchange Mailbox Not Receiving Email from External IDs?
-
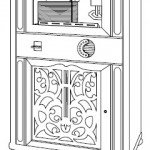 How to Build a Jukebox
-
 How To Create a Simple Search Engine
-
 Software Tools For Building Electronics
-
 Improve Security With VERIS Framework
-
 What You Should Do If Computer Crash
-
 How to set up Web Server on Windows, Linux, and Mac Using Apache
-
 Tools You Need For Virtualisation
-
 Connecting Ruby to Java Programming
-
 Audio Technica ATH-M40x
-
 Sony Acid Music Studio 10
-
 5 Great Recording Software Programs
-
 How To Use Cloud-Based Storage Wisely
-
 Memcached in MySQL
-
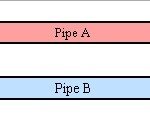 Basic Guide of Interprocess Communication and Pipes
-
 How To Create a Web Crawler and Data Miner
-
 Hardening MySQL Security Server
-
 How to Test and Debug A Program
-
 Forensics Analysis of SQLite Database
-
 Avoiding NSA Trap


