
Encrypt drives with zuluCrypt
While you can control access to the data on your computer using user accounts and file permissions, they aren’t enough to prevent a determined intruder from gaining access to your private files. The only reliable way to keep your personal data to yourself is to encrypt it. Sure, working with encrypted data is an involved process, but it’ll go a long way in reinforcing your security and insulating your data. zuluCrypt is a graphical encryption app that has an intuitive easy to follow interface. Using the app you can create an encrypted disk within a file, a partition and even USB disks. It can also encrypt individual files with GPG.
To install zuluCrypt head to http://mhogomchungu.github.io/zuluCrypt/ and scroll down the page to the binary packages section. The app is available as installable .deb package files for Debian and Ubuntu. Download the package for your distro and extract it with tar xf zuluCrypt*.tar.xz . Inside the extracted folder, switch to the folder corresponding to your architecture (i386 for older 32-Bit machines and amd64 for new 64-Bit ones). Both folders contain four binary packages that you can install in one go with the sudo dpkg -i *deb command. On other distros you’ll have to install zuluCrypt manually. Download the app’s tarball and follow the detailed steps in the included BUILD-INSTRUCTIONS file to fetch the dependencies from your distro’s repos.
One of the first things you should do after installing is to create encrypted versions of all files that you consider sensitive. Fire up the app and head to zC > Encrypt A File. In the dialog box that comes up press on the button adjacent to the Source field and navigate to the file you wish to encrypt. zuluCrypt will use this information to create a file with the same name and append the .zC extension at the end – or save it elsewhere by clicking on the folder icon adjacent to the Destination field and navigating to a new location.
Next enter the password for encrypting the file in the key field. Make sure the password is a mix of characters and numbers to make it difficult to guess. Also remember that there’s no means of recovering the password if you ever forget it, and no possibility of decrypting the file – that’s sort of the point! Once you’ve confirmed the password press the Create button to encrypt the file. This process might take some time depending on the type and size of the file you are encrypting. Once it’s done you’ll have the encrypted version with the .zC extension in the destination location you specified earlier. Once a file has been encrypted, make sure you delete its original version.
You’ll now have to decrypt the file before you can read and make changes.For this, launch zuluCrypt and head to zC > Decrypt A File. Point to the encrypted file in the Source field and alter the location of the unlocked file in the Destination field. Now enter the password with which you encrypted the file and click the Create button. When it’s done, the decrypted file will be created in the specified destination. To lock the file again, encrypt it by following the previously outlined procedure.
Encrypted data silos
Individually encrypting files works well if you only need to protect a couple of files. Also, it’s a cumbersome process and is only suitable for files you don’t need to read or modify regularly. If you need to protect a number of files that you access frequently, a better approach is to file them inside encrypted storage areas.
zuluCrypt can perform block device encryption, which means that it can encrypt everything written to a certain block device. The block device can be a whole disk, a partition or even a file mounted as a loopback device. With block device encryption, the user creates the file system on the block device, and the encryption layer transparently encrypts the data before writing it to the actual lower block device. While encrypted the storage areas just appears like a large blob of random data and doesn’t even reveal its directory structure.
To create an encrypted storage device within a file, fire up zuluCrypt and head to Create > Encrypted Container In A File. In the window that pops up you’ll have to enter the name and complete path of the directory under which you’ll house your sensitive data. It’s called a file, because it’ll appear as a singular file when it’s encrypted. You’ll also have to specify the size of the directory depending on the size of the files it’ll house and the space available of your disk.
When you press the Create button, zuluCrypt pops up another window. First up you’ll have to specify a password for encrypting the file. Next, you’ll have to select a Volume Type. The default option is LUKS or Linux Unified Key Setup, which is a disk-encryption specification designed specifically for Linux. In addition to LUKS, zuluCrypt can also create and open TrueCrypt, VeraCrypt and Plain volumes. Plain volumes are headerless encrypted volumes and the encryption information is provided by zuluCrypt. Because of this, Plain volumes are application-dependant and not very portable. TrueCrypt or VeraCrypt volumes are better alternatives if the encrypted volume is to be shared between Linux, Windows and OS X computers.
Once you’ve decided on the type of Volume, you’ll have to pick a cipher, an algorithm that does the actual encryption and decryption. An associated attribute of the cipher is the associated size of the key. As the key size increases, so does the complexity of exhaustive search to the point where it becomes impracticable to crack the encryption directly.
The most popular encryption cipher is the Advanced Encryption Standard (AES) which is based on the Rijndael cipher. AES with a key size of 256 bits is widely used as it offers the right balance of speed and security. This is the default cipher in zuluCrypt. However the app supports a large number ciphers including the Twofish algorithm, and Serpent. These two are considered by the US National Institute of Standards and Technology to have a higher security tolerance than AES, but are also slower.
You can safely select the default values for each field, including the default filesystem for the volume (EXT4) and press the Create button. When the process completes, you’ll notice a file with the name you specified for the encrypted container with illegible content and size equivalent to what you specified earlier.
Making sense
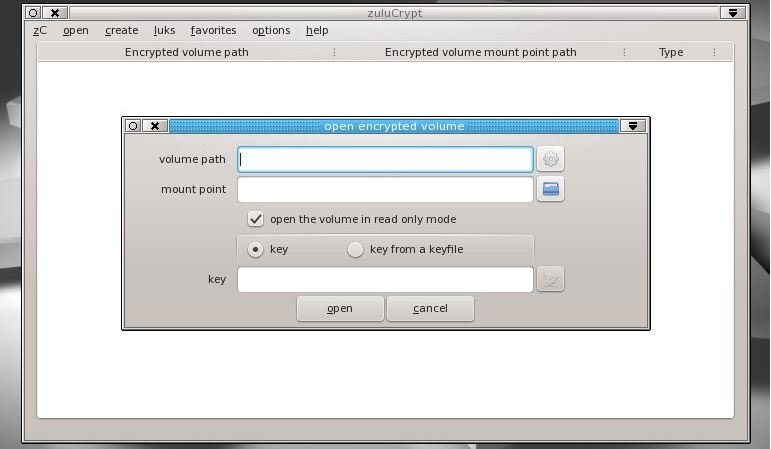
Before you can store files inside this encrypted volume you’ll first have to decrypt and mount it. Head to Open > PLAIN,LUKS,TrueCrypt Container In A File. Use the file button in the pop up window to navigate to the encrypted container file that you’ve just created. If you wish you can alter the mount name for the file, else just enter the password and press Open. Toggle the checkbox if you only want to read the contents of encrypted volume.
Once your volume is mounted it’ll appear in your file system like any other mounted file system. The main zuluCrypt window will also list the volume along with the complete mount path. You can now create directories within this mounted location and create files just like you would on any regular mounted device. When you’re done, right-click on the mounted volume in the zuluCrypt interface and select the ‘Close’ option. This will unmount and encrypt the volume and all you’ll have once again is the single encrypted file with illegible content. Mount the file again following the procedure mentioned above to reveal its contents.
If you have issues managing multiple passwords, zuluCrypt gives you the option to create random keyfiles which you can then use to encrypt files and volumes. To generate a keyfile head to Create > Keyfile. Now enter the name for the keyfile and its storage path. From a security point of view, you should make sure the keyfiles are not stored on the same hard disk as the files or volumes it encrypts. In fact it’s best to keep these on an external drive which ensures that your encrypted data remains secure even if someone grabs hold of your drive containing the encrypted files and volumes.
To use a keyfile instead of a password, select the keyfile option using the drop-down menu when creating an encrypted volume or encrypting a file. After selecting this option you’ll also have to point the app to the keyfile, which will then be used to lock your data.
Scramble partitions and disks
If you want to encrypt large amounts of data, it’s best to place the encrypted container inside a partition of its own or even on a removable USB drive. Note that when you create such a container zuluCrypt takes over the entire partition or disk, so make sure you’ve backed up any existing data.
Also, make sure that the destination partition or drive isn’t mounted. Use the mount command to list all mounted partitions. If the partition you wish to use, say /dev/sdb1, is mounted, you’ll first have to unmount it with sudo umount / dev/sdb1 .
Now launch zuluCrupt and head to Create > Encrypted Container In A Hard Drive. In the window that pops up, zuluCrypt will list all the available partitions that it can use to house the encrypted volume. Note that the devices are listed both by device name and by the associated UUID. If you are creating a container on a removable disk, make sure you toggle the Use UUID option. This will ensure that zuluCrypt always correctly identifies the device. Now double-click on the drive/partition you wish to create the volume on. You can now create an encrypted volume on it using the same exact procedure we used earlier to create an encrypted volume inside a file.
Although at first it might sound cumbersome to use, but over time zuluCrypt will grow on you as you get familiar with the app. There is no easier way for the privacy conscious to keep their data secure. Currently zuluCrypt only available for Linux OS. To encrypt drive/partition in Windows, you can use BitLocker.
You May Want to See :
-
 Protect Your Data Using BitLocker
-
 Share your gameplay on YouTube with Google’s Streaming Service
-
 How To Connect Raspberry Pi To A Network
-
 MSI H97 Gaming 3
-
 Thermaltake Suppressor F51
-
 Intel’s first skylake chips coming in August
-
 Asrock X99 E-ITX
-
 Dell Inspiron 13 5000 2-in-1
-
 Kingston HyperX Cloud II
-
 Gigabyte X99-Gaming 5
-
 PC Specialist Trion 960
-
 GIGABYTE H97-Gaming 3
-
 Dell Inspiron 13 7000 2-in-1
-
 Steelseries Siberia Elite Prism
-
 Google Unveils Smart Hub
-
 Choosing an OS for your Raspberry Pi
-
 How to Install NTOPNG, A Web-Based Network Traffic Analysis Tool
-
 Gigabyte GA-X99-UD3P
-
 Aerocool BattleHawk Black
-
 Dell Inspiron 15 5000 2-in-1
-
 Thermaltake Shock Console


