
Essential Photography Tips & Tricks
Lighting, Make sure the light is right
Adding artificial light, such as a camera flash, can help brighten up a scene where natural light is not available. When using natural light, consider the ideal times for the best results. Harsh sunlight can make a photo look flat and unattractive, which makes shooting in the middle of the day very undesirable.
- Natural light
This is often the most flattering form of light to use, as it gives an even spread across the scene, without over or under exposing any part of it. - Bounce the light
Bouncing the light is great for directing it where it is needed, and can be done with a dedicated reflector or any light surface, such as white card. - Artificial light
Often used when shooting indoors or when there is no natural light. It can be used effectively to light the subject, but it can be difficult to get even results. - Low light
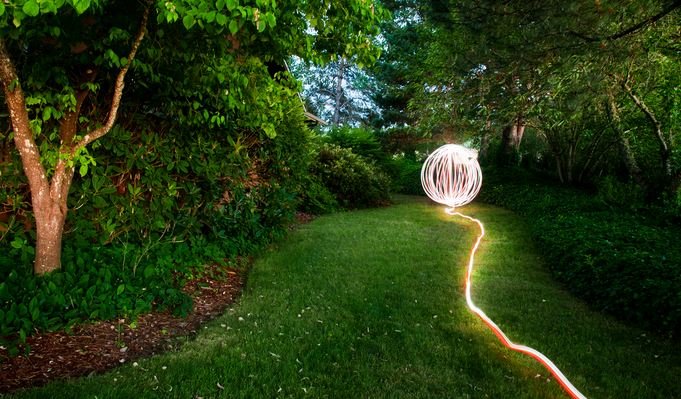
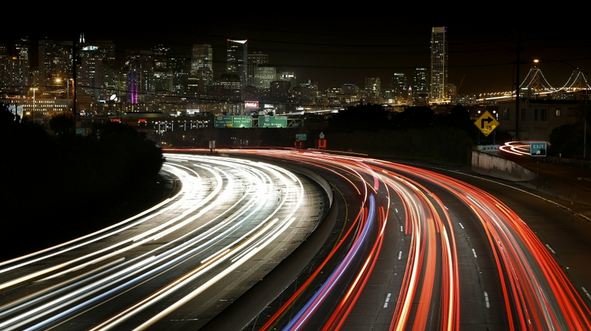
Low light can create dramatic images, but they’re hard to master. Try a nighttime setting or use a higher ISO to let more light onto the camera’s sensor. - Harsh lighting – natural light
Natural light can often have a harsh effect on the photo. This is common when shooting in the middle of the day, and when the position of the sun hasn’t been considered.
Composition, A good composition is the first step to a great photo
 Always consider the composition, how the photo will look, and what you are trying to show. The position of the main subject in the frame is key, and correct placement can enhance the overall look of the photo. Becareful not to do common mistakes. It is important to make the shot visually interesting, while encouraging the viewer to scan the entire image. Using leading lines and the correct lighting will do this.
- Distracting backgrounds
Ensure you have a good backdrop to your photo, regardless of the subject. - Correct lighting
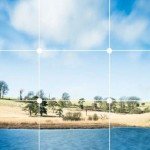
A badly lit or under exposed image will not be pleasing to look at, and will not present the subject very well. - Rule of thirds
For a balanced image, place your main point of interest a third of the way up and preferably off-centre. - Focus point
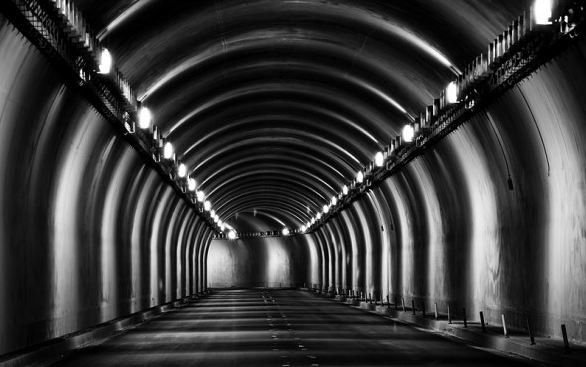
Have a main point of interest, and place the camera’s focus upon this point. - Leading lines
Consider your subject and how you want to portray it in the photo before firing away. When framing the shot, use leading lines to draw the viewer towards the subject.
Additionally you can improve composition by using these three ways.
Exposure, The exposure of an image dictates light levels
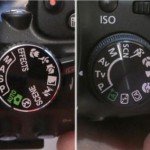
 Your camera’s exposure tells it how much light to let in when taking the photo. The amount of light let in determines how bright or dark the image will appear once it has been taken. Exposure is one of the key parts of photography; learning how to master it will go a long way to ensure you get the very best photo each time you press that shutter. There are several settings primarily formed around correctly exposing the photograph, and these settings can be manually or automatically controlled. Ultimately, an image which comes out too dark is commonly referred to as being underexposed, while an image which is too bright is referred to as being overexposed.
- Aperture
Aperture determines how ‘open’ the lens is, so how much light is ‘seen’ by the sensor. Set using ‘f-numbers’, the lower the f-number, the wider the aperture. Aperture can also be used to create different depths of field, so how much of the scene is in focus. - ISO
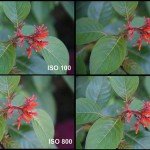
The ISO value determines what the camera’s sensor does with light. A higher ISO value will make the camera more sensitive to it, allowing for a brighter image. A lower ISO makes the sensor less sensitive to it, but will also produce a more crisp image. - Shutter speed
Determining for how long the shutter is open. A fast speed means the photo is taken quickly. Slower speeds mean more light gets on to the sensor. Leave a shutter open for longer for movement blur. - Histogram
A graph displaying light levels across the photo, from black on the left to white on the right. The heights display how many pixels sit at that light level. View a histogram to get an even exposure across the range.
White balance, Getting colours accurate
 Your camera’s white balance can affect the overall tone of your photo. It is a function that removes the different colour casts created by the lighting in the scene. In simple terms, it is used to ensure the colours in the scene are as accurate as possible. It does this by measuring the colour temperature of the photo and adjusting the colours accordingly.
- Cloudy
The Cloudy setting will compensate for the lack of sunlight and harsh cloud coverage, generally enhancing the photo with a warmer tone. - Tungsten
This white balance setting is used when shooting indoors, under harsh and direct fluorescent lighting. It cools down the photo and removes unwanted colour casts. - Flash
When using a camera’s flash, the shot can be quite washed out and cool. This white balance setting therefore compensates for the flash by warming the photo slightly. - Shade
A scene which is covered by lots of shade has a cooler look, with a flat tonal range. The Shade white balance setting warms up the shot and gives it a more natural look.
You May Want to See :
-
 Macro Photography Like A Pro
-
 Capture The Movement of The Stars Across Night Sky Like A Pro
-
 5 Things you should know before buying a camera
-
 Optimal Camera Settings For Wildlife Photography
-
 The relationship between ISO & image Noise
-
 SONY Alpha 7S II
-
 Pentax K-S2
-
 Sony Cyber-shot DSC RX100 IV
-
 Sony introduces A7R II
-
 Canon EOS 5DS R
-
 Canon EOS 750D
-
 Canon Unveils Superzoom G3 X
-
 Make Your Own Made Reflector
-
 Quick Guide to Photographing Fungi
-
 Leica S
-
 Canon EOS 760D
-
 10 Ways to Win Photo Competitions
-
 Three Essential Ways To Improve Composition
-
 Basic Techniques For Wildlife Photography
-
 How to keep your camera gear safe?
-
 Best Accessories You’ll Need in Wildlife Photography


