
Connect your apps to iTunes Search API
In this tutorial, you will know how to connect to the iTunes search API using Swift, download the JSON results, and parse them to the dictionaries. This information will then be used to populate the table views. A click event will then be added to the table view for the sake of user interaction. On clicking this item, the iTunes store will be opened.
How to Connect the User Interface
We should begin by getting a reference to the tableview. In the ViewController.swift just outside other functions and after class definition, add the following code:
|
1
|
@IBOutlet var appTV : UITableView
|
The variable appTV will make it possible to connect to the Table View in the storyboard. Save the file above.
Open the storyboard. Drag from the Table View to the View controller object. This will link these objects.
How to Make the API Request
Since we have connected the user interface, we can make the API call. Create a new function, and give it a name of choice. I have called mine iTunesSearch(searchterm: String). After searching arbitrary terms, this will cause the request to happen. Write the code below:
|
1
2
3
4
5
6
7
8
9
10
11
12
|
func iTunesSearch (term: String) {
// replace spaces with + symbol.
var iTunesTerm = term.stringByReplacingOccurrencesOfString(" ", withString: "+", options: NSStringCompareOptions.CaseInsensitiveSearch, range: nil)
// anything that is URL friendly should be escaped
var escapedTerm = iTunesTerm.stringByAddingPercentEscapesUsingEncoding(NSUTF8StringEncoding)
var path = "https://itunes.apple.com/search?term=\(escapedTerm)&media=software"
var url: NSURL = NSURL(string: path)
var rqst: NSURLRequest = NSURLRequest(URL: url)
var ctn: NSURLConnection = NSURLConnection(rqst: rqst, delegate: self, startImmediately: false)
println("URL for searching iTunes API \(url)")
ctn.start()
}
|
We have started by fixing the search term that we pass in. The iTunes search APi recommends that terms should be of the form first+ second+ third+ words. This contradicts the form first%20second%20. This is why we have used an NSString method, that is, stringByReplacingOccurencesOfString.
The search term will be modified by replacing all the available spaces with a + symbol. You can also see the escape, which will make it possible to escape the search term if a symbol that cannot fit in the URL is found. We have also defined an NSURL, which can be used in iOS8’s network API as a Request URL. The lines below as used above are very important:
|
1
2
3
|
var rqst: NSURLRequest = NSURLRequest(URL: url)
var ctn: NSURLConnection = NSURLConnection(rqst: rqst, delegate: self, startImmediately: false)
|
The first line has used the url that we created as the target URL to create an NSURLRequest object. The second line has done the main job by creating a connection which is to be used for sending the request. The purpose of setting the delegate to self is to be able to listen to the information that will come from the connection inside the view controller class. To begin the request, we have used ctn.start().
How to Prepare for the Response
Now that we have sent the Request, we need to prepare for the response that we will get. At the end of viewDidLoad, add the following code:
|
1
|
iTunesSearch("JP Software")
|
“JP Software” is our search term, so the function will search for any software in the iTunes store which contains that phrase. You can change the search term to what you want to look for from the iTunes store. A data object to contain the results is needed for us to get the results. Let us create an instance of NSMutableData as a class member. Inside the curly brace and just below the class definition, add the following line of code to achieve this:
|
1
2
3
|
var d: NSMutableData = NSMutableData()
var tData: NSArray = NSArray()
|
Now we are prepared to receive the response. It is time to receive it. Add the following chunk of code:
|
1
2
3
4
5
6
7
8
9
10
11
12
13
14
15
16
17
18
19
|
func ctn(receivedResponse: NSURLConnection!, receivedResponse response: NSURLResponse!) {
// clear out the data object if a new request was received.
self.d = NSMutableData()
}
func ctn(ctn: NSURLConnection!, receivedData d: NSData!) {
// add the received data to the data object self.d.appendData(d)
}
func ctnFinishedLoading(ctn: NSURLConnection!) {
// self.d should hold the resulting info, request is complete
// received data is converted into an object through JSON deserialization
var err: NSError
var jResult: NSDictionary = NSJSONSerialization.JSONObjectWithData(d, options: NSJSONReadingOptions.MutableContainers, error: nil) as NSDictionary
if jResult.count>0 && jResult["results"].count>0 {
var results: NSArray = jResult["results"] as NSArray
self.tData = results
self.appsTableView.reloadData()
}
}
|
The NSURLconnection receives the response, and then it will call the receivedResponse method. A new and empty object will be in the line self.d= NSMutableData(). Once the connection is established, data will be received through the method receivedData(). The important information here is the argument passed in the method. Every chunk of data is important, and that is why we have used self.d to append it.
Note that we have used the ctnFinishedLoading() method in the final step. This is after the connection has been established and all the data has been received. We can then use the received data in our app. The NSJSONSerialization converts the received data into data dictionary objects which are useful. This is achieved by deserialization of the results from iTunes.
The final process involves validating the results so as to check on whether they are what we expected. The resulting data can then be set to the table data by self.tData object. The appsTableView reloads its content.
How to Update the Table View UI
Remember that the table view has two functions, a cell function for creation and modification of cells for each row and a count function whose purpose is to count the number of rows. We need to put the data we obtained from the web into the table. Consider the code below:
|
1
2
3
4
5
6
7
8
9
10
11
12
13
14
15
16
17
18
|
func tView(tableView: UITableView!, numberOfRowsInSection section: Int) -> Int {
return tData.count
}
func tView(tView: UITableView!, cellForRowAtIndexPath indexPath: NSIndexPath!) -> UITableViewCell! {
let cell: UITableViewCell = UITableViewCell(style: UITableViewCellStyle.Subtitle, reuseIdentifier: "Cell for Testing")
var rData: NSDictionary = self.tData[indexPath.row] as NSDictionary
cell.text = rData["trackName"] as String
// Grabbing the artworkUrl60 key for getting image URL for the thumbnail of the app
var uString: NSString = rData["artworkUrl60"] as NSString
var iURL: NSURL = NSURL(string: uString)
// Download representation of the image as NSData at the URL
var iData: NSData = NSData(contentsOfURL: iURL)
cell.image = UIImage(data: iData)
// obtain the formatted price string to be displayed on the subtitle
var fPrice: NSString = rData["fPrice"] as NSString
cell.detailTextLabel.text = fPrice
return cell
}
|
numberOfRowsInSection will return the number of resulting objects from the tableData member. This is set tothe ctnFinishedLoading method. The row number has been to grab three values, so we don’t return the row number but the three values. These three keys are then used to construct the title, the subtitle, and the image that will be put along the cell.
The ViewController.swift should look as follows:
|
1
2
3
4
5
6
7
8
9
10
11
12
13
14
15
16
17
18
19
20
21
22
23
24
25
26
27
28
29
30
31
32
33
34
35
36
37
38
39
40
41
42
43
44
45
46
47
48
49
50
51
52
53
54
55
56
57
58
59
|
import UIKit
class ViewController: UIViewController, UITableViewDataSource, UITableViewDelegate, NSURLConnectionDelegate, NSURLConnectionDataDelegate {
@IBOutlet var appsTableView : UITableView
var data: NSMutableData = NSMutableData()
var tData: NSArray = NSArray()
override func viewDidLoad() {
super.viewDidLoad()
iTunesSearch("Angry Birds");
}
func iTunesSearch(term: String) {
// replace spaces with + symbol.
var iTunesTerm = term.stringByReplacingOccurrencesOfString(" ", withString: "+", options: NSStringCompareOptions.CaseInsensitiveSearch, range: nil)
// Anything which is not URL-friendly is escaped
var escapedTerm = iTunesTerm.stringByAddingPercentEscapesUsingEncoding(NSUTF8StringEncoding)
var uPath = "https://itunes.apple.com/search?term=\ (escapedTerm)&media=software"
var url: NSURL = NSURL(string: uPath)
var rqst: NSURLRequest = NSURLRequest(URL: url)
var ctn: NSURLConnection = NSURLConnection(rqst: rqst, delegate: self, startImmediately: false)
println("URL for searching iTunes API \(url)")
ctn.start()
}
func tView(tView: UITableView!, numberOfRowsInSection section: Int) -> Int {
return tData.count
}
func tView(tView: UITableView!, cellForRowAtIndexPath indexPath: NSIndexPath!) -> UITableViewCell! {
let cell: UITableViewCell = UITableViewCell(style: UITableViewCellStyle.Subtitle, reuseIdentifier: "Cell for Testing")
var rData: NSDictionary = self.tData[indexPath.row] as NSDictionary
cell.text = rData["trackName"] as String
// Grabbing the artworkUrl60 key for getting image URL for the thumbnail of the app
var uString: NSString = rData["artworkUrl60"] as NSString
var iURL: NSURL = NSURL(string: uString)
// Download representation of the image as NSData at the URL
var iData: NSData = NSData(contentsOfURL: iURL)
cell.image = UIImage(data: iData)
// obtain the formatted price string to be displayed on the subtitle
var fPrice: NSString = rData["fPrice"] as NSString
cell.detailTextLabel.text = fPrice
return cell
}
}
func ctn(receivedResponse: NSURLConnection!, receivedResponse response: NSURLResponse!) {
// clear out the data object if a new request was received.
self.d = NSMutableData()
}
func ctn(ctn: NSURLConnection!, receivedData d: NSData!) {
// add the received data to the data object
self.d.appendData(d)
}
func ctnFinishedLoading(ctn: NSURLConnection!) {
// self.d should hold the resulting info, request is complete
// received data is converted into an object through JSON deserialization
var err: NSError
var jResult: NSDictionary = NSJSONSerialization.JSONObjectWithData(d, options: NSJSONReadingOptions.MutableContainers, error: nil) as NSDictionary
if jResult.count>0 && jResult["results"].count>0 {
var results: NSArray = jResult["results"] as NSArray
self.tData = results
self.appsTableView.reloadData()
}
}
|
Now the app is ready for running, so do so. Our search term was Angry Birds, so the following will be obtained as the result:
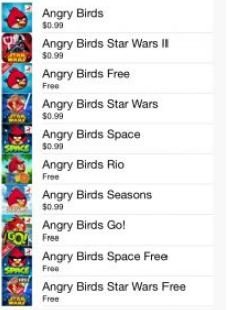
Final Result
You May Want to See :
-
 Simple Way to Connect Swift to PHP Code
-
 How to Create iOS Swift “Hello World” Program
-
 Creating an Audio Player with Swift
-
 NSTimer in Swift
-
 Create Animations in Swift Programming
-
 Build A Progressive Web App Using Service Workers
-
Enumerations in Swift Programming
-
 How To Use Objective-C Classess in iOS Swift
-
 Create and Manage Offline Maps in Google’s Maps App
-
 Memcached in MySQL
-
 Integrating User Authentication Using PHP
-
 Reduce android screen brightness with Night Mode
-
 Manage Large CSS Projects With ITCSS
-
 Forensics Analysis of SQLite Database
-
 Building A Website With Phoenix Framework
-
 Telegram Android
-
 Enable the Classic Windows Start Menu to Microsoft Windows 8
-
 Creating Simple TCP/IP Server And Client to Transfer Data Using C# / VB.net
-
 Why You Should Create Grids With PostCSS-Ant ?
-
 Creating Simple UDP Server And Client to Transfer Data Using C# / VB.net
-
 Basic Operators in Python Programming


