
Secure your site with a free SSL Certificate
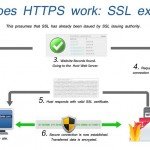
It has always been commonplace for e-commerce websites to enforce all communication over HTTPS; HTTP over SSL/TSL. Through an encrypted connection, HTTPS ensures that no ‘man in the middle’ attacks can steal sensitive information such as credit card details and passwords.
However, it makes sense that any communication between a website and its user can benefit from the security provided by the SSL/TSL protocol.
Over the past few years, big companies have pledged to switch all of their web traffic to HTTPS in an effort to beef up security when browsing online. With Google pushing the benefits of SSL and most social media sites having implemented it as standard, we are now firmly in the security conscious age of the web.
As of August 2014, Google announced in a blog post that it uses SSL encryption as a ranking signal. It is very rare of Google to offer up an insight into how it ranks searches, however, in this case it shows just how seriously Google is taking web security. While it’s not going to have an effect anywhere near that of content quality, we are now at a point where the cost and time involved in implementing SSL makes it a very viable option for all.
To secure a site with HTTPS, you are required to install an SSL certificate. This previously involved generating a signing request on your server, paying a certificate authority to provide you with an SSL certificate, then installing that certificate and configuring your web server yourself.
This complexity and cost was often the reason HTTPS was implemented only on priority sites. However, in 2014 the Let’s Encrypt project was publicly announced with a goal of securing the web through free, easy-to-implement SSLs. Let’s Encrypt left beta in April this year and has since issued over 10 million certificates with the help of some very big name partners such as Mozilla.
The bottom line is, if your website allows any sort of user data entry, you should implement an SSL certificate. Regardless of this, it is beneficial for your SEO and general integrations to enforce HTTPS. So, with that in mind, let’s do just that.
1. Prerequisites
It is assumed you are running Apache on Ubuntu 16.04 and that you are familiar with using Terminal. You must have shell access on your server with root privileges and be logged in via SSH to get started. Let’s Encrypt is compatible with most operating systems but this process varies slightly between them.
2. Installing the client
The first step is to ensure our system’s repositories are up to date and to install the Let’s Encrypt client that handles all the heavy lifting for us.
|
1
2
|
sudo apt-get update
sudo apt-get install python-letsencrypt-apache
|
3. Request a certificate
We must now request the certificate for our single site. This involves calling the letsencrypt command with our domain name and sub domains as flags. Start with your root domain, followed by the common www subdomain. If you make use of other subdomains, such as blog, be sure to add them in as well.
|
1
|
sudo letsencrypt --apache -d technotif.com -d www.technotif.com
|
4. Provide a point of contact
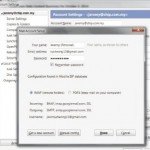
The first time you run the let’s encrypt command, you will be presented with a prompt asking for your email address. This will allow Let’s Encrypt to alert you if something goes wrong at any point. Fill this in and hit enter to continue.
5.Accept terms and initiate request
You will also be asked to accept Let’s Encrypt’s terms of service. Agree is selected by default, so once you’ve given it a read, hit enter or return to start the certificate request process.
6.Easy or secure?
A final prompt will ask if you’d like HTTPS access to be required or optional. For the purpose of this tutorial we will select the default Easy option so we can see the two working side by side. This will help us test and develop; we can then enforce HTTPS when needed.
7.Final prompt from the client
Assuming everything went well, the process will finish up with a final prompt. Hit OK and you will see a message similar to the following:
IMPORTANT NOTES:
-
Congratulations! Your certificate and chain have been saved at /etc/ letsencrypt/live/technotif.com/fullchain.pem. Your cert will expire on 2017-01-01. To obtain a new or tweaked version of this certificate in the future, simply run letsencrypt-auto again with the “certonly” option. To non-interactively renew *all* of your certificates, run “letsencrypt-auto renew”
-
If you like Certbot, please consider supporting our work by: Donating to ISRG / Let’s Encrypt: https://letsencrypt.org donate Donating to EFF: https://eff.org/donate-le
8. Test the install
Now it’s time to see HTTPS in action! Navigate to your site, but with https, for example, https://technotif.com. Your site should load as you would normally expect. This serves to let us know our config is running happily as expected!

9. Additional sites? No problem
Each unique domain should have its own certificate. Sharing of certificates is likely to confuse users as they will see a different domain listed compared to the domain they are actually on. While it is common to share a certificate across sub domains, beyond this, individual certificates are recommended.
Luckily for us, Let’s Encrypt makes this incredibly simple, only requiring you to run the same ‘letsencrypt’ command with new domain flags.
It is worth noting that if you have missed a sub domain from a certificate, you can simply re-run the same command again. Make sure to include all the same domains as you did the first time, then just add the missing domain on to the end. Let’s Encrypt will see that a certificate already exists, and will ask you if you want to expand the existing certificate.
Simply repeat steps 3-8 as required to add new certificates for additional domains.
10. Setting up auto renewal
Let’s Encrypt certificates have a short three-month life-span, however, auto renewal is baked in to take care of re-issuing certificates easily. To trigger this automatically and avoid any manual input, we need to set up a CRON job. To do this, let’s first open up the CRON file with the nano editor.
|
1
|
export VISUAL=nano; sudo crontab -e
|
11. Adding the command to the CRON tab
We will now create a CRON job that calls the built-in renew function every Monday at 9am. The program is clever enough to look over all certificates and only renew the ones that are due to expire, otherwise it just skips them. Any errors will get written to a log file to help debug any potential errors.
|
1
|
0 9 * * 1 /usr/bin/letsencrypt renew >> / var/log/le-renew.log
|
12. Save and exit
Now it’s simply a case of saving and exiting the editor to have auto renewal up and running. Press Ctrl & X together to exit, followed by Y to confirm you want to save all changes.
13. Validating your setup
It is important to check everything is secured and set up as it should be. This is done via an excellent online tool by SSL Labs. Simply navigate to the link, replacing example. com with your own domain.
|
1
|
https://www.ssllabs.com/ssltest/analyze.html?d=technotif.com&latest
|
14. Updating site links
To ensure you don’t get any unexpected security warnings, all links on your site should be updated to HTTPS where possible. This includes head links to CDN libraries, internal navigational links and image sources to name a few. For example:
|
1
|
<img src=”http://technotif.com/favicon.ico”/>
|
Should be updated to:
|
1
|
<img src=”https://technotif.com/favicon.ico”/>
|
15. Updating third-party services
Another place that may need updating is third-party tools such as Google Analytics. It is possible to set HTTPS as the preferred protocol within Google Analytics site settings and is recommended you do so.
16. Redirecting to HTTPS
If you navigate to your site, you will notice that you can access it with both http:// and https://. To ensure your site only allows secure traffic, we need to redirect all HTTP traffic to the HTTPS equivalent page. We can do this per site with some simple code in the .htaccess file. So start by navigating to your site’s root folder on your server, and open/create the .htaccess file
|
1
2
|
cd /var/www/html/technotif.com/web/
sudo nano .htaccess
|
17. Modifying your .htaccess
We are going to use Apache’s mod_rewrite to perform the redirect. This is done by looking for the port number. Non-secure traffic comes in on port 80 by default. We can therefore look for this, and redirect to HTTPS in a way that avoids those nasty 404s. Copy and paste the following code into the top of the file. Then repeat step 12 to save and exit.
|
1
2
3
4
5
6
7
|
# Force HTTPS
<IfModule mod_rewrite.c>
RewriteEngine On
RewriteCond %{SERVER_PORT} 80
RewriteRule ^(.*)$ https://%{SERVER_NAME}/$1
[R,L]
</IfModule>
|
18. Monitor via webmaster tools
After all these updates, it is important to monitor your site closely for a few days in case you’ve missed a link that needed updating. If you have your site set up in Google Webmaster Tools, simply check it periodically for the first few days!
19. Final statement
It is important to know that SSL does not single-handedly secure your site. End-to-end encryption is only a means of securing communication between your server and the client’s browser. There is still a need to secure your server and ensure any code you write is done so with security in mind. Simple things such as only installing trusted software, keeping software up to date, encrypting passwords and ensuring sensible file permissions all help to keep your site and your users safe.
You May Want to See :
-
 Stay Safe on Public Wi-Fi
-
 How to Integrate Payments with Stripe API
-
 Protect Your Data Using BitLocker
-
 Building A Website With Phoenix Framework
-
 Simple Way to Automate Your Social Networks
-
 Encrypt drives with zuluCrypt
-
 Hacking Wireless Networks
-
 Protect your Mail by Encryption
-
 How to Deal With Disputes on eBay
-
 Choosing an OS for your Raspberry Pi
-
 Double Your Battery Life
-
 Share your gameplay on YouTube with Google’s Streaming Service
-
 Wireshark Tutorial to Analyse traffic
-
 How to Set Up Wallet and Activate Apple Pay
-
 How To Connect Raspberry Pi To A Network
-
 Picasa
-
 Why Choose Joomla ?
-
 Google moves on from CAPTCHA
-
 What You Should Do If Computer Crash
-
 Manage Multiple Cloud Service Storage Space at Single Location with MultCloud
-
 Build A Progressive Web App Using Service Workers


