
Opening An Electronic Circuit Without Breaking
Once upon a time, getting at the circuitry of a consumer product was a piece of cake. Remove a few screws, pop off the back, and there it was. Providing access to the inner workings was a tradition begun in the vacuum tube days, when the unit’s owner needed to get inside on a frequent basis to change tubes, lamps and fuses. After semiconductor technology replaced the troublesome tubes with considerably more reliable transistors, there was still the expectation that the buyer might have a legitimate need to reach the circuit board. Early solid-state products even put the transistors in sockets! As semiconductors got sturdier, the sockets went away, which was good since their flaky connections caused more failures than did the transistors themselves. There were still lamps and fuses to contend with, though, and access was expected and easy.
That was before today’s age of complex, ultra-miniaturized circuits, complete lack of user-serviceable parts (mostly thanks to the LEDs that replaced lamps), and lawsuits. These days, no manufacturer wants you anywhere near the stuff under the hood.
Consequently, many equipment cases are deliberately sealed, or at least made pretty tough to open. Most AC adapters are ultrasonically welded together and have to be cracked open; even the expensive ones are considered non-repairable items by their makers. Lots of laptop computers, video projectors, MP3 players and TVs sport hidden snaps, so they won’t pop apart even after you remove the screws. See Figure 9-1. And anyone who’s ever tried to take apart a certain American computer company’s sleekly designed products knows the meaning of frustration; they’re clamped together seamlessly and tightly in a clearly deliberate attempt to keep you out.
So how do you open up these crazy things? Sometimes, others have suffered before you and have posted step-by-step disassembly instructions on their Web sites, with clear photos of the whole process. If you can’t fathom how to get something apart, it pays to do a Web search on “disassemble ______,” with the blank filled in by the name or model number of your product. Some companies selling parts post these.

helpful tutorials, facilitating your getting to the point of having a reason to order their wares.
If you can’t find disassembly instructions, you’ll have to wing it. With or without help, this is the stage at which you have the most opportunity to wreck your device! Without X-ray vision, you can’t know if that tiny screwdriver you’re using to pry the case halves apart or unhook the hidden snaps you’re not even sure are there might be ripping a tiny component off the circuit board or causing some other drastic damage. You also have no idea whether a ribbon cable may join the two halves and be torn when they suddenly separate. And nothing is more frustrating than thinking you’re about to repair something and destroying it instead, before you ever get a chance to look for the original problem.
Despite all this gloom and doom, you can get into nearly any product successfully and safely if you’re careful and take your time. Disassembly is not a trivial process; expect it to take a significant portion of the total repair time, at least with the smallest, most complex devices. There are some tricks to the endeavor, and we’re going to explore them now. But first, some rules:
- Rule number one, Always disconnect power before taking something apart. This is true with battery-operated products as well as AC-powered ones. Even if there’s no danger to you, you have a much higher chance of damaging the device if power is connected when things come apart, whether the unit is turned on or not. Pull the plug, yank the batteries.
- Rule number two, Remove everything you can before going for the screws. Battery covers, recording media (tapes, discs, memory cards), rubber covers over jacks, lanyards—if it comes off, take it off. There’s no need to pull knobs from a front panel if you don’t anticipate having to remove the panel, but that’s about it. Everything else should go. And don’t be too surprised if you later wind up having to take off those knobs after all.
- Rule number three, Never force anything. If the case won’t come apart, or some corner seems stuck, there’s a reason. Perhaps snaps are hiding on the inside of the plastic. Screws are sometimes hidden under labels and rubber feet. Run your fingernail over labels, looking for the indentation where a screw head might be lurking. If you find one, peel back the label just enough to get to the hole. Peel back the rubber foot near the stubborn area; just because the other feet aren’t hiding screws doesn’t mean this one isn’t. You’ll probably have to glue the foot back on later, but it’s a necessary consequence of peeling the original adhesive.
- Rule number four, Don’t let frustration drive you to make a destructive mistake. Even the calmest tech can get riled up when a recalcitrant patient tries his or her patience badly enough. The most common errors are to start moving too fast, to force something, or, in extreme cases, to smack the casing, hoping it’ll loosen up. Bad idea! Okay, I admit it: I once threw a really nice, rather expensive pocket stereo cassette player against the wall after a maddening, futile hour of trying to take it apart, but I don’t recommend the exercise. It felt good, but, needless to say, that repair job was over before it began. Plus, for weeks I was stepping on pieces of that poor little thing I’d murdered. I couldn’t help but think of Poe’s The Tell-Tale Heart every time something went crunch underfoot. At least it was my own player, and not something I’d have to replace for a customer or lose a job over.
Separating Snaps
Popping apart hidden snaps is almost an art form in itself. First, be absolutely sure you’ve removed all the necessary screws. Take a look at the bottom of the unit to see if there might be slots into which you can put a screwdriver to pop the snaps. Those are common on AC-operated devices whose bottoms face shelving, but not on pocket toys. If you do find slots, shine a flashlight into one and see if you can deduce what needs to be pressed in which direction to unhook the snap. Pop one open while pulling the case halves apart with your free hand. To prevent accidental reinsertion, keep holding them apart while you do the next snap on that side of the case. Once you have a couple of snaps open, you won’t need to continue the forced separation, and the rest should open easily.
If you find no slots, pick one side of the case and press on the seam around the edge, looking for inward bending of the plastic. Move slowly and feel for slight movements indicating where hidden snaps may lie. When the plastic gives a little, press harder and attempt to pull the seam up. If it won’t budge despite your best efforts, move to another part of the case and try again. After you get one snap undone, the rest will release a lot easier.
If no amount of effort will release the snaps, you might be tempted to slip a small screwdriver into the seam and pry it open. It’s a last-ditch procedure, but it usually works. It’s almost certain to break snaps, though, and cause some visible damage on the outside of the case.
Even with the best technique, you’ll break a few while you get the hang of it, and occasionally even after you’re an expert. Luckily, it’s not the end of the world. Often the loss of a snap or two has little or no effect on a product’s integrity, but sometimes the reassembled case can feel loose or have a gap along the desnappified seam. Just save the broken pieces in case you need to melt them back on later.
You May Want to See :
-
 Remove Components From Circuit Board
-
 Reassembly Circuit Board
-
 Recognize Major Feature of A Circuit Board
-
 Fixing A Broken Laptop
-
 Deepcool Captain 240
-
 How to Build an Audio Level Controller
-
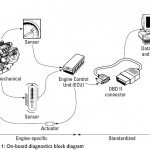 Own Made Automotive Diagnostic
-
 Tinkering With Portable DVD Players
-
 Storage Upgrades, Advice For Businesses Of All Sizes
-
 Intel i7-5960X Extreme Edition
-
 Software Tools For Building Electronics
-
 3 Types of Drones: RTF, BNF, and ARF
-
 4 reasons to keep a home phone
-
 Repairing Noisy Notebook Fan
-
 Make Your Own Fish Tank Monitor
-
 Sensor and Alerts For Fish Tank Monitor
-
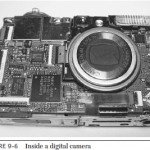 Tinkering With Digital Cameras
-
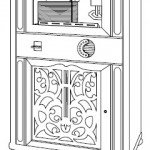 How to Build a Jukebox
-
 How 3D Printing Pen Work ?
-
 Top 3D Printers Desktop Options
-
 GAW Miners Hashlet


