
Repairing Noisy Notebook Fan
The fans in old notebooks often become disruptively noisy. The repair-operation, which deals with an “open heart surgery” of the computer, can take a long time. For this tutorial, we used a notebook manufactured in 2006 to show you how you can get to the fan. If it starts rattling loudly, you should just get it replaced. Replacements can occasionally be found on eBay. If the fan sounds normal, but constantly revs itself up, it usually helps after cleaning up the fan grill and applying some new thermal grease.
Fixing Notebook’s Fan Step by Step
1. Disengage the screws

Step 1
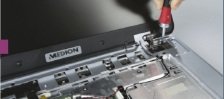
To disassemble the device, disengage all the screws on the underside of the computer. Remove all the removable parts (battery, DVD-burner, hard drive, RAM, WLAN card etc.). Turn the computer around and swing the display out all the way. Unclip the cover above the keyboard, as well as the keyboard itself.
2. Dismantle the display
Step 2
A thick monitor-cable and two thin WLAN antennas lead from the display to the motherboard. Pull the WLAN antennas out of the casing (make sure the WLAN card has been removed). Disengage the monitor-cable’s plug not by pulling on the cable, but by pulling on the black plastic lug that’s below another flat cable. Disengage the three screws that have been used to attach the two hinges of the display to the body of the notebook.
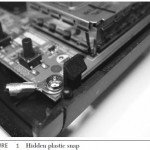
3. Remove the face plate

Step 3
Detach the flat cable of the switch panel that is above the keyboard, and then remove the panel that has been fastened using three
large screws. Remove the remaining plug of the cover-sensor from the motherboard and unclip the face plate on all sides without
using too much force. If it gets snagged at a point, check whether you have missed a screw on the underside.
4. Remove the mainboard

Step 4
Remove all five plugs from the motherboard and extract the loudspeaker unit on the left. Then disengage the two screws that have been used to fasten the mainboard in place, and lift it out.
5. Remove the Cooler

Step 5
Remove the plug of the fan that is on the upper side of the mainboard. Turn the board around, disengage the cooling element’s five screws and lift it out.
6. Replace fan
Step 6
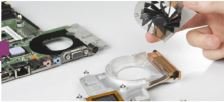
The fan is attached to the cooling element with the help of four screws. Unscrew it, use a table vacuum cleaner to vacuum the fan
grill from the inside, and replace the fan, if necessary. Use a microfibre cloth that has been soaked in propyl alcohol to clean the processor and the cooling element’s contact surface, and sparingly apply new thermal grease. When the device is being assembled, check whether you have re-attached all the screws and plugs, in order to avoid the need to make frustrating corrections.
You May Want to See :
-
 Own Made Automotive Diagnostic
-
 Fixing A Broken Laptop
-
 Reassembly Circuit Board
-
 Meet the New Intel Devil’s Canyon
-
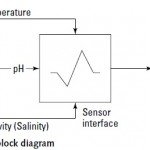 Sensor and Alerts For Fish Tank Monitor
-
 Building Your Jukebox to Your Own Design
-
 GAW Miners Hashlet
-
 How 3D Printing Pen Work ?
-
 MSI GAMING Nightblade
-
 Aria Gladiator Fraction
-
 Kingston HyperX Savage
-
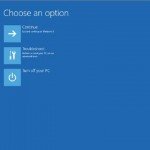 Accessing Windows 8 System Recovery Console
-
 Speed Up Windows Startup
-
 3 Types of Drones: RTF, BNF, and ARF
-
 Opening An Electronic Circuit Without Breaking
-
 How to Build an Audio Level Controller
-
 Tinkering With Portable DVD Players
-
 Top 3D Printers Budget Options
-
 Storage Upgrades, Advice For Businesses Of All Sizes
-
 Recognize Major Feature of A Circuit Board
-
 How to Build a Jukebox


