
Reassembly Circuit Board
When you’re finished tinkering or fixing an electronic stuff. You have to reassembly it’s case. Now it’s time to put everything back together. Just screw the boards down, plug in the connectors, close the lid and you’re done, right? Well, sometimes, but not performing the reassembly methodically can lead to all kinds of trouble, from failure of your repair to new damage, and even to danger for the product’s user. You’re sewing up your patient after the operation, and it’s important to put in the stitches carefully and avoid leaving a scar.

Common Errors
It might seem absurd to think that one could reassemble a machine and have parts left over, but it happens all the time. You snap that final case part into place, breathe a sigh of relief, glance at the back of your workbench, and there it is: some widget you know belongs inside the unit, but you forgot all about it. Hmm, is it really worth all the trouble to backtrack, just for one little, seemingly non-essential item? Sigh…. Time to pull the whole mess apart again. It’s very easy to forget to replace a bracket, a washer, a shield, a cover or even a cable. The unit might function without one of those pieces, but it’s not going to work completely right.
Putting the wrong screws in the wrong places may have no consequences, but it also could seriously damage the device. If a screw that’s too long presses against a circuit board, it might short whatever it touches to the chassis, hence to ground. You flip on the power and, voilà, you have a new repair job on your hands. See the definition of magic smoke in the Glossary.
Overtightening screws can strip their heads, making it very hard to get them out again. It can also break plastic assemblies and cause cracks in the case. Undertightening screws may lead to their falling out later, possibly jamming mechanisms or shorting out circuitry if they’re internal screws.
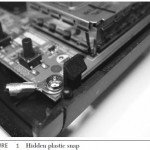
Our memories can really fool us sometimes. You’re certain that part went over here, but now it doesn’t quite fit. So, you press a little harder, because you know that’s where it goes. Snap! Oh, right, it went over there, not over here. If something doesn’t want to fit together, it probably belongs somewhere else. This kind of error happens more with mechanical parts than with electronic components.
Manufacturers try to make internal connectors different enough from each other that only the correct cables will fit. In products with lots of connectors, though, there may be ambiguity. CRT projection TVs, for instance, have so many connectors that there’s just no way to make them all distinct, and sometimes a color code is all you have to guide your reassembly. It’s not hard to get one wrong. Guess what happens when you turn the set on.
Even when you put ribbon cables in the right connectors, it’s easy to damage them. They’re delicate and easily torn or folded hard enough to snap their printed copper conductors. The connectors are fairly breakable too, especially the tiny ones in pocket-sized products. Those plastic sliders that hold the cables in place snap off without much pressure. Worse, the entire connector can break its solder joints and fall right off the board, just from the stress of being pushed on while the cable is inserted and clamped down. I’ve seen that happen on digital cameras and pocket video gear.
Getting Started
To begin reassembly, reverse the order in which you took the machine apart. When the unit has multiple boards, you’ll need to get the inner ones reinstalled first. If a board that’ll wind up under another board has connectors, put the cables in before covering up that board.
In older gear, take a look at the ground lands on circuit boards, where the screw or the metal bracket makes contact. They exist to connect those points to ground via the chassis, and a poor connection due to oxidation or corrosion can seriously affect the product’s performance. Clean them up with some contact spray or, in extreme cases, fine sandpaper. Make sure the screws are tight, so contact will be reliable, but don’t overtighten to the point that you might crack the board. Heating and cooling in larger items, and physical stress in portable devices from being bounced around, can cause cracks later on if the screws are extremely tight.
A little sealant on a screw head is better than pushing the limits of tightness. Manufacturers and pro shops use a type of paint called glyptal to keep screws from loosening. Swabbed around the edges of the screw head, it is highly effective. You can use nail polish. Don’t glob it on; just a little smear will do fine. Be careful not to cover components or their leads, and let it dry before closing the case, so the outgassing won’t remain inside. I use red polish so I can see where I’ve been, should I open the unit again later on.
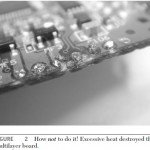
Placement of wires and cables is called lead dress, and it can be surprisingly important. When you took the unit apart, you may have noticed that some wires were tacked down with hot-melt glue or silicone sealer. If the manufacturer went to the trouble to do this, there was a reason. Maybe the wire needed to be kept away from a hot heatsink that could melt its insulation. Perhaps a cable carries a weak, delicate signal that would receive interference if it got too close to some other element of the machine. This can be the case with the cables going to video head drums. Or maybe the reverse is true: the cable would cause interference to other sensitive circuits. Wires carrying high voltages, like those used to run projector lamps and LCD backlights, may need to be kept away from all other circuitry to avoid not only interference but the possibility of arcing. The closer a high-voltage wire is to ground, the more those devious electrons want to punch through the insulation and get there. Give ’em time and they just might.
If the manufacturer tacked wiring down, put it back the way you found it. Hot-melt glue is somewhat flammable, and it melts with heat, of course, so it isn’t used much in larger products. Now and then, you may find it in smaller items that don’t carry much voltage or produce significant heat. To tack wires back down into it, you can melt the blob with your plastic-melting iron, avoiding any other wires, or drip a little more glue on top from your glue gun.
More often, you’ll find silicone sealer used to secure wires. The type used is called RTV, and it’s best to replace it with the same kind, because it offers the correct insulating strength. RTV is available at most hardware stores, and electronics supply houses carry it too.
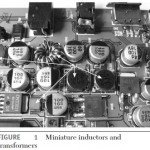
Now and then, and especially in small-signal RF stages operating at very high frequencies, you’ll see blobs of wax covering transformers and capacitors. The wax holds the parts to the board and dampens vibrations that can cause noises in signals or frequency instability in oscillators. In some circuits, the capacitance of the wax may affect circuit operation, so it’s best to remelt and reuse the original wax. It’s not the same stuff that’s in the candles on your dinner table.
Even if the manufacturer took no extra care with wiring, you should pay attention to the issue to achieve maximum product reliability and safety. Could a power supply lead touch a heatsink? Is the cable from a tape head going right by the power supply? And, perhaps most important, is any wire or cable placed such that it’ll get crimped by a circuit board or part of the case when reassembly is complete? The sharp ends of a board’s component leads can go right through a wire’s insulation, with disastrous results. Crimping caused by the case can break the wire or cut through the insulation and short it to the chassis. With a wire carrying unisolated AC power, a crimp could even present a shock hazard. If the case halves don’t mate properly, a wire is probably in the way. Don’t just squish them together and go on.
These scenarios may sound farfetched, but they’re really pretty common. I always make it a point to watch the wiring as I close up the case, imagining where things will be and how they’ll press on each other before I actually snap the halves together or tighten the final screws.
You May Want to See :
-
 Recognize Major Feature of A Circuit Board
-
 Remove Components From Circuit Board
-
 Opening An Electronic Circuit Without Breaking
-
 Own Made Automotive Diagnostic
-
 How to Build an Audio Level Controller
-
 Software Tools For Building Electronics
-
 Repairing Noisy Notebook Fan
-
 Top 3D Printers Desktop Options
-
 Fixing A Broken Laptop
-
 Tinkering With Portable DVD Players
-
 Tinkering With Digital Cameras
-
 Mad Catz Arcade Fightstick Tournament Edition 2
-
 Sensor and Alerts For Fish Tank Monitor
-
 Top 3D Printers Budget Options
-
 4 reasons to keep a home phone
-
 Make Your Own Fish Tank Monitor
-
 Building Your Jukebox to Your Own Design
-
 How 3D Printing Pen Work ?
-
 3 Types of Drones: RTF, BNF, and ARF
-
 GAW Miners Hashlet
-
 How to Build a Jukebox


