
Building A Website With Phoenix Framework
Phoenix is a Web Framework written in Elixir that works similarly to Rails but is faster and more scalable than Rails. This tutorial will show you how to create a simple blog site using Phoenix and some Elixir code. You can find more about Phoenix at www.phoenixframework.org but don’t spend too much time on reading because the correct way to learn Phoenix is by writing applications!

Before installing Phoenix you will need to install some additional packages to create a proper development environment and make your life easier:
|
1
2
|
$ mix local.hex
$ ps ax | grep -i postgr
|
The first command installs Hex, which is the package manager of Elixir. The second one confirms that PostgreSQL is both installed and up and running; if not, please install it and start the PostgreSQL server process. You can verify that you can successfully connect to the running PostgreSQL server process as follows:
|
1
2
3
4
|
$ sudo -u postgres psql
psql (9.5.3)
Type "help" for help.
postgres=#
|
If PostgreSQL is not running for some reason, you will get an error message similar to the following:
|
1
2
3
|
$ psql
psql: could not connect to server: No such file or directory
Is the server running locally and accepting connections on Unix domain socket "/tmp/.s.PGSQL.5432"?
|
Then, you can use mix to install Phoenix:
|
1
|
$ mix archive.install https://github.com/phoenixframework/ archives/raw/master/phoenix_new.ez
|
You can find the version of Phoenix you’re using as follows:
|
1
2
|
$ mix phoenix.new -v
Phoenix v1.2.1
|
Although it is not absolutely necessary to install and use Node.js for your Phoenix projects, Node.js can be very helpful and is used by Phoenix, so visit http://nodejs.org and install Node.js before continuing with the tutorial. You can find your Node.js version as follows:
|
1
2
|
$ node --version
v4.2.6
|
Enough with the dependencies, it is now time to start using Phoenix to create a simple website.
Phoenix project
This project will be the equivalent of the elementary “Hello World!” program that everyone tries out when starting to learn to code. First, you will have to create a new Elixir project using mix as follows:
|
1
2
3
4
5
6
7
|
$ mix phoenix.new hw
...
Fetch and install dependencies? [Yn] Y
...
$ cd hw
$ mix ecto.create
$ mix phoenix.server
|
The first command creates a new Phoenix project at the current directory, named hw. After executing mix ecto.create you might get some error messages that have to do with the database connection; in that case, edit ./config/dev.exs and make sure that you put the connect username, password and database information near the end of the file. However, for this simple project, this is not necessary.
The mix phoenix.server command starts Phoenix router, which you can also start with the interactive Elixir shell:
|
1
|
$ iex -S mix phoenix.server
|
The previous command starts an HTTP server that usually listens to port number 4000 and is useful for testing your application. The good thing is that it also displays information about user requests:
|
1
2
3
4
5
6
|
$ mix phoenix.server
[info] GET /
[debug] Processing by Hw.PageController.index/2
Parameters: %{}
Pipelines: [:browser]
[info] Sent 200 in 24ms
|
So, if you visit http://localhost:4000/ you will see Phoenix default web page (See below).
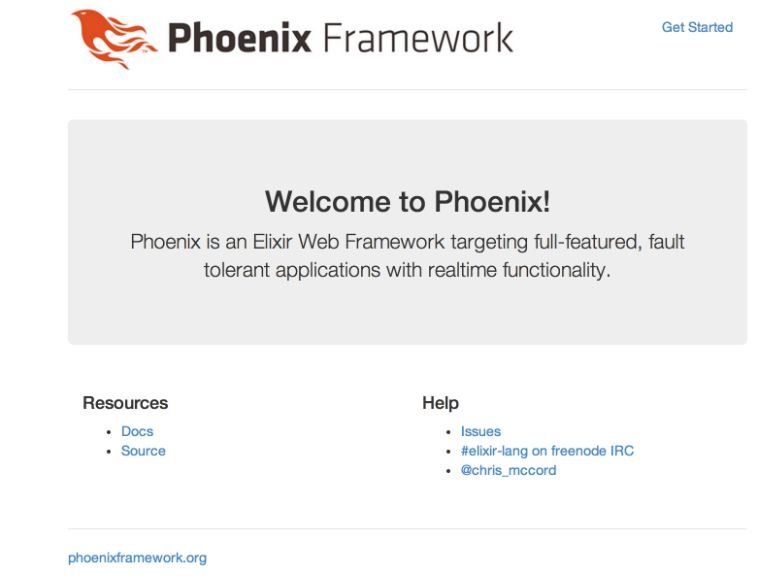
The HTML code for displaying Phoenix default webpage is hard coded inside the ./web/templates/page/index.html.eex file. Should you wish to display something different, you should carefully change the contents of this file.
At this point, you usually define your routes, which you can think of as the paths supported by your web application, and write the necessary code so that each URL displays the right output. Because this is a simple project, it will support just one path, which will only display a simple message. So, the contents of router.ex need not be changed.
After learning the basics, it is about time to develop something practical using Phoenix.
Blog it
You will now learn how to create a blog site using Phoenix. In order to create a Phoenix project named “blog”, you will need to execute the following commands
|
1
2
3
4
5
6
7
|
$ mix phoenix.new blog
...
Fetch and install dependencies? [Yn] Y
...
$ cd blog
$ mix do deps.get, compile
$ mix local.hex
|
Once again, you will need to edit ./config/dev.exs and insert the correct PostgreSQL information, which will be the subject of the next section.
Talking to a database
Phoenix uses PostgreSQL by default; although it is possible to use another database server if required, it is wise to stay with PostgreSQL because Phoenix has better support for PostgreSQL than for alternatives.
For the purposes of this tutorial the name of the database will be “Technotif” and the name of the user that will be used will be “Technotifuser” with a password of “aPassword” – you will learn more about the tables that are going to be created in a while.
The next thing you should do is execute the following commands from the PostgreSQL shell:
|
1
2
3
4
5
6
7
8
|
mtsouk=# CREATE USER Technotifuser WITH PASSWORD 'aPassword';
CREATE ROLE
mtsouk=# CREATE DATABASE Technotif;
CREATE DATABASE
mtsouk=# GRANT ALL PRIVILEGES ON DATABASE Technotif to Technotifuser;
GRANT
mtsouk=# ALTER USER Technotifuser CREATEDB;
ALTER ROLE
|
Now put the correct information inside ./config/dev.exs.
That’s it for the database related things, so we can now continue building the project:
|
1
2
3
|
$ mix ecto.create && mix ecto.migrate
$ npm install
$ mix phoenix.server
|
The npm install command installs Node.js dependencies, whereas the mix ecto.create && mix ecto.migrate commands create and migrate your database. This time the mix phoenix.server command should generate no database related errors.
The next command will execute a Phoenix generator that will create some things for us:
|
1
2
3
4
5
|
$ mix phoenix.gen.html Post posts title:string body:text
...
Add the resource to your browser scope in web/router.ex: resources "/posts", PostController
Remember to update your repository by running migrations:
$ mix ecto.migrate
|
What we did here is declaring the name of a web page in both singular (Post) and plural (posts) as well as the fields of it (title, body) along with their types (string, text).
As the output of the previous command suggests, it is time to add a new route.
Routing is the process that Phoenix has to do so that each HTTP request will be served by the appropriate Elixir code. You will need as many routes as the number of static web pages your project has. If you have dynamic pages, then you will need fewer routes. The project file with the routing information for the blog project is ./web/router.ex. At this point, you will need to add just one route:
|
1
2
3
|
$ diff router.ex router.ex.orig
20d19
< resources "/posts", PostController
|
After this, you will need to execute the following command for changes to take effect in the PostgreSQL part:
|
1
|
$ mix ecto.migrate
|
The following command shows the routing list of our project:
|
1
2
3
4
5
6
7
8
9
10
11
12
13
14
|
$ mix phoenix.routes
Compiling 9 files (.ex)
Generated blog app
page_path GET / Blog.PageController :index
post_path GET /posts Blog.PostController :index
post_path GET /posts/:id/edit Blog.PostController :edit
post_path GET /posts/new Blog.PostController :new
post_path GET /posts/:id Blog.PostController :show
post_path POST /posts Blog.PostController :create
post_path PATCH /posts/:id Blog.PostController
:update
PUT /posts/:id Blog.PostController :update
post_path DELETE /posts/:id Blog.PostController
:delete
|
You now have a fully working blog site and you are allowed to stop here.
But why not go further? The following section will briefly show how to add support for comments.
Adding comments
Making it possible to add comments to your blog posts is not as difficult as it might sound. First you will need to execute two commands:
|
1
2
3
4
5
6
7
8
9
10
11
12
13
14
15
16
|
$ mix phoenix.gen.model Comment comments name:string content:text post_id:references:posts
* creating web/models/comment.ex
* creating test/models/comment_test.exs
* creating priv/repo/migrations/20160813080840_create_ comment.exs
Remember to update your repository by running migrations:
$ mix ecto.migrate
$ mix ecto.migrate
Compiling 1 file (.ex)
Generated blog app
11:08:55.467 [info] == Running Blog.Repo.Migrations. CreateComment.change/0 forward
11:08:55.467 [info] create table comments
11:08:55.472 [info] create index comments_post_id_index
11:08:55.474 [info] == Migrated in 0.0s
|
The post_id:references:posts part of the first mix command tells Phoenix how a comment should reference a blog post in the database. You will now need to edit ./web/ models/comment.ex and make the following changes:
|
1
2
3
4
5
6
7
8
9
10
11
12
13
14
15
16
17
18
19
20
|
$ diff comment.ex comment.ex.orig
7c7
< belongs_to :post, Blog.Post, foreign_key: :post_id
---
> belongs_to :post, Blog.Post
12,14d11
< @required_fields ~w(name content post_id)
< @optional_fields ~w()
<
18,20c15,18
< def changeset(model, params \\ %{}) do
< model
< |> cast(params, @required_fields, @optional_fields)
---
> def changeset(struct, params \\ %{}) do
> struct
> |> cast(params, [:name, :content])
> |> validate_required([:name, :content])
23d20
<
|
Last, you will need to edit ./web/models/post.ex to let it know that it supports multiple comments:
|
1
2
3
4
5
6
7
8
9
10
11
12
13
14
15
16
17
18
19
20
21
22
23
24
25
|
$ diff post.ex post.ex.orig
3d2
< import Ecto.Query
8d6
< has_many :comments, Blog.Comment
13,15d10
< @required_fields ~w(title body)
< @optional_fields ~w()
<
19,28c14,17
< def changeset(model, params \\ %{}) do
< model
< |> cast(params, @required_fields, @optional_fields)
< end
<
< def count_comments(query) do
< from p in query,
< group_by: p.id,
< left_join: c in assoc(p, :comments),
< select: {p, count(c.id)}
---
> def changeset(struct, params \\ %{}) do
> struct
> |> cast(params, [:title, :body])
> |> validate_required([:title, :body])
|
Now execute mix ecto.migrate from the root directory of your Phoenix project. You will now need to change the routing table (./web/router.ex) and add an Elixir function (:add_a_ comment) in order to implement comments:
|
1
2
3
4
5
|
$ diff router.ex router.ex.orig
20,22d19
< resources "/posts", PostController do
< post "/comment", PostController, :add_a_comment
< end
|
Now you should edit ./web/controllers/post_controller. Put simply, you create a new plug, you implement the add_a_comment function and you make a small change to the existing implementation of the show function. You will now need to create ./web/templates/post/ comment_form.html.eex, which will be the web page for writing comments. Then, you need to make a change to ./ web/templates/post/show.html.eex to turn on comments. Now, create ./web/templates/post/comments.html.eex, which will be used for displaying the comments and make it active inside ./web/templates/post/show.html.eex. Now that you are done with the development of the blog site, you can start using it. Image below shows the home page of the site as well as the web page for creating new blog posts.

Although the blog site is far from complete, it is working without requiring you to write too much Elixir code! Should you wish to improve it, you can add user support and the ability to add images to your blog posts. The last step would of course be to deploy your website to a web server for the world to use and enjoy, but the details of how you do this are beyond our brief for this tutorial.
You May Want to See :
-
 How to Install NTOPNG, A Web-Based Network Traffic Analysis Tool
-
 Secure your site with a free SSL Certificate
-
 8 Ways To Optimise Your Wordpress Site
-
 How to Integrate Payments with Stripe API
-
 Simple Way to Connect Swift to PHP Code
-
 How to track your run with the Apple Watch
-
 Hacking Wi-Fi with Kali Linux
-
 Wireshark Tutorial to Analyse traffic
-
 Extend Your Wordpress Theme With WP Child Themes
-
 Double Your Battery Life
-
 What You Can Do To Prevent Battery Loss?
-
 How to Deal With Disputes on eBay
-
 Improve Website Performance Through Caching
-
 Why is Exchange Mailbox Not Receiving Email from External IDs?
-
 Connect your apps to iTunes Search API
-
 How to set up Web Server on Windows, Linux, and Mac Using Apache
-
 How To Find SQL Injection Vulnerabilities Automatically
-
 Prevent SQL Injection by Using Runtime Protection
-
 Connecting Ruby to Java Programming
-
How to Make A Good eBay Listing That Can Attract Buyers
-
 Share your gameplay on YouTube with Google’s Streaming Service


Kinda leaves the reader hanging without showing the comment view code doesn’t it?
I agree with Matt, the article feels unfinished without the :add_a_comment code and changes to other files. For as much depth as you go into for the rest of the article, leaving those things off feels too much like “eh I’m bored with writing this, figure the rest out”.