
Create Shiny Metallic Effect Using Photoshop
If you’ve always wanted to learn how to create a shiny metallic effect, you’ve come to the right place. The first thing you must bear in mind is that a chrome effect is simply a very reflective surface, such as that of a mirror. Second, you have to think about how light and colours from the surrounding landscape will be reflected on a particular shape.
We are going to create a spherical shape and then create a convincing chrome effect using standard filters, layer styles and other simple techniques. Another cool feature covered in this tutorial is the clipping mask. Unlike layer masks, which are applied only to a single layer, the clipping masks allow us to mask multiple layers at the same time, which can be handy when creating this kind of effect.
If you are using Photoshop Elements, don’t worry, you can follow these steps and check the Expert Tip for alternative methods for creating a similar effect. Files and images are available, which you will need if you want to follow this tutorial.
1. Open the image

In this tutorial we will use cherry image. Hit Cmd/Ctrl+J to duplicate the layer. Name the new layer Cherry. Now hit Cmd/Ctrl+T. On the toolbar link to maintain the aspect ratio and set the Width to 130%.
2. Create a Path

Grab the Pen tool (P) and create a path around a cherry (Elements users must use the Quick Selection tool (A)). On the toolbar click Make Selection, leave the Feather Radius at 0 pixels, check Anti-aliased and click OK.
3. Refine edges

Now hit Cmd/Ctrl+J to duplicate the layer. Name it Metal Cherry. Hold Cmd/Ctrl and click on the layer’s thumbnail to select it. Now go to Select>Refine Edge. Set Smooth to 5, Feather to0, Contrast to 0 and Shift Edge to -100, and click OK.
4. Make adjustments

Go to Image>Adjustments>Hue/ Saturation and set Saturation to -100 or press Shift+Cmd/Ctrl+U. Now go to Layer>Adjustment Layer>Levels. In the New Layer window, check ‘Use Previous Layer to Create Clipping Mask’ and hit OK. Set the Input Levels to 0; 1.75; 120.
5. Create the chrome effect

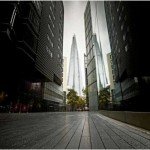
Insert a landscape image. Now go to Layer>Rasterize>Smart Object (Elements users must go to Layer>Simplify Layer). Hold Cmd/Ctrl and click on the layer’s thumbnail to select the image.
6. Apply the Distort filter

With the Landscape layer selected, go to Filter>Distort>Spherize. Set Amount to 100% and hit OK. Press Cmd/ Ctrl+F to apply the effect again. Hit Cmd/ Ctrl+D to deselect and grab the Elliptical Marquee (M). Hold Shift and drag the selection from the top-left to bottom-right.
7. Resize it

Hit Cmd/Ctrl+J to duplicate the layer and name it Chrome. Now delete the Landscape layer. Hit Cmd/Ctrl+T to open the Free Transform tool and resize the Chrome layer to about the same size of the Metal Cherry layer and press Return/Enter.
8. Style the layer

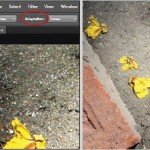
Now go to Layer>Layer Style>Inner Shadow (Elements users should check note below). Set the blend mode to Multiply, Colour: # 508711, Opacity: 75%, Angle: -90, check Use Global Light, set the Distance to 300px, Choke: 0%, Size: 5px, and Contour: Rounded Steps.
Note : The Inner Shadow layer style is not available in Elements. To create an alternative effect, first follow steps 6 and 7, then create a new layer (Layer>New>Layer). Grab the Elliptical Marquee tool (M) and drag the selection from the top-left corner to the right. Now press Shift+Cmd/Ctrl+I to Invert and then use the Paint Bucket (K) in order to fi ll the selection with colour # 508711, set the Opacity to 35% and then clip the layer by pressing Cmd/Ctrl+G.
9. Rasterize the layer style

Go to Layer>Rasterize>Layer Style. Now go to Layer>Create Clipping Mask or press Opt/Alt+Cmd/Ctrl+G. Click on the Metal Cherry Copy layer in order to make it active and go to Layer>Layer Mask>Apply.
10. Use the Warp tool

Click on the Chrome layer to make it active and press Cmd/Ctrl+T to open the Free Transform tool. Click on Warp mode (Elements users must go to Filter>Liquify). Click and drag the handles to adjust the ‘chrome’ around the Cherry and hit Return/Enter.
11. Go to Layer mask

Go to Layer>Layer Mask>Reveal All. Press D on your keyboard to set the default Foreground/Background colour. Press Shift+X to switch the Foreground colour to black. Now grab the Brush tool (B), choose a soft tip, Size 150, and paint on top of the cherry.
12. Add reflections

Click on the Cherry layer. Grab the Pen tool (P), and create a path around the cherry on the left side (Elements users must use the Quick Selection tool). On the toolbar, click Selection and then click OK. Press Cmd/Ctrl+J to duplicate the layer, and name it Cherry 1.
13. Apply Free Transform

Deselect the layer (Cmd/Ctrl+D). Drag the Cherry 1 layer on top of the Chrome layer. Now hit Cmd/Ctrl+T, resize the image around 80% and click Return/Enter. Now go to Filter>Distort>Pinch, set the Amount to -100 and hit OK.
14. Create Clipping mask

Go to Layer>Create Clipping Mask. Set Opacity to 60%. Place the image around the edges. Select the Cherry1 layer and go to Layer>New Adjustment Layer>Hue/Saturation. In the New Layer window, check ‘Use Previous Layer to Create Clipping Mask’, and hit OK. Set the Lightness to -30.
15. Repeat the steps

Now repeat steps 12 to 14 to create the reflection on the other side. Grab the Elliptical Marquee tool (M) and select a piece of the leaf, move on top the layer stack, set the blending mode to Multiply. Use the Free Transform and warp to adjust the size and distortion.
16. Bevel & Emboss

To refine the effect, click on the Metal Cherry Copy layer and go to Layer>Layer Style>Bevel&Emboss. Set Style to Inner Bevel, Smooth, Depth to 100%, Direction to Down, Angle to -80, check Use Global Lights, Altitude to 30, Highlight to a red, Opacity to 100% and Shadow to green. Click OK.
17. Add finishing touches

Click on the very top layer in the Layers palette.Go to File>Place>’Sunburst.jpg’ and hit Return/Enter. Change the blending mode to Screen and resize the image. Create a stamp by pressing Shift+Cmd/Ctrl+Opt/Alt+E. Now go to Filter>Render>Lens Flare, set Brightness to 60%, Lens Type to 105mm Prime and press OK. (Source : Photoshop Creative Issue 120)
You May Want to See :
-
 Melting Effect with Liquify Filter
-
 Simple way to remove object inside picture using Adobe Photoshop
-
 Reveal everything with shadows and highlights using Photoshop
-
 Blend faces together
-
 Remove Tattoos Using Photoshop Elements
-
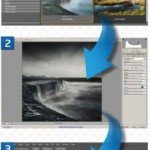 Manage Your Photos From Capture to Output in Three Stages
-
 Draw With the Pen Tool
-
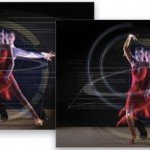 Create Geometry Effects Photoshop
-
 Apply Coloured Eye Shadow
-
 Make a Photo Look Old
-
 Create A Seamlessly Repeating Pattern
-
 Create A 3D Chess Set with Photoshop
-
 How to Invert Image In Photoshop Lightroom
-
 How to Process RAW Files in Adobe Camera Raw
-
 Repair Old Photo and Image Using Photoshop Elements 12
-
 Best way to light a chocolate scene
-
 Protect Your Website Against XSS
-
 What is CSS and What CSS can do ?
-
 5 Secret Tips for Your Display Screen
-
 Create and Manage Offline Maps in Google’s Maps App
-
 Tips on Choosing the Right Telescope