
How to Invert Image In Photoshop Lightroom
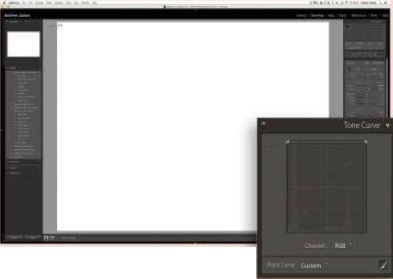
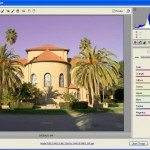
There is a way to do it, but it’s not as easy as the Photoshop method. In Photoshop, you go to Image > Adjustment > Invert and the photograph will instantly invert, as you can see on the inset image. Lightroom doesn’t have a one-click solution, but it is possible to create a similar effect using the Tone Curve in the Develop module.
It’s not just colour images you can do it with either. If you’ve converted a raw file to black and white in Lightroom, then you can use the same process in Curves to reverse the blacks and whites for a very graphic look.
To invert an image, click on the symbol in the bottom right corner of the Tone Curve so that none of the Highlights, Lights, Darks and Shadows sliders are visible. Now click in one of the corners where the line meets the right-angle. If it’s the bottom left corner then click and drag the line up to the top left corner. Do the same with the top right corner, clicking and dragging it to the bottom right.
It’s a bit fiddly doing this and you might need to try a few times. Keep the line straight as you do it and go slowly. If it curves then reset it and start again! The result isn’t exactly the same as you get in Photoshop but remember, once inverted, you can still play around with the image even more.
Create a digital negative look using the Tone Curve
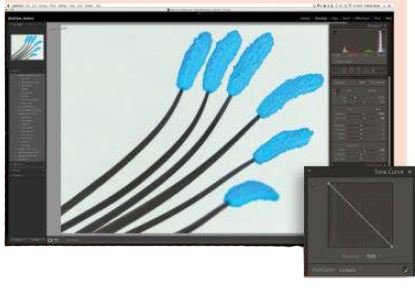
- Initial work Choose your image and do any basic work that you think needs doing to it. Once you are satisfied with the exposure, cropping and so on, you can move on to the next step.

- Switch tones Click on the very bottom left hand corner of the tone curve and drag it up to the corner above it (top left). This can be tricky but do it slowly and steadily it will work. All detail will disappear but don’t panic!
- Repeat switch Now you just do the same process but drag the tone curve from the top right to bottom right until you have basically reversed the whole Tone Curve and your image’s tones have been inverted.
You May Want to See :
-
 Create Geometry Effects Photoshop
-
 Simple way to remove object inside picture using Adobe Photoshop
-
 Make a Photo Look Old
-
 Best way to light a chocolate scene
-
 Repair Old Photo and Image Using Photoshop Elements 12
-
 Manage Your Photos From Capture to Output in Three Stages
-
 Reveal everything with shadows and highlights using Photoshop
-
 Create A Seamlessly Repeating Pattern
-
 Create A 3D Chess Set with Photoshop
-
 What’s New in Adobe Lightroom 6 ?
-
 How to Process RAW Files in Adobe Camera Raw
-
 Blend faces together
-
 PLE Achromic GTX970
-
 Adobe announces major Photoshop and Lightroom CC upgrade
-
 Creating an Audio Player with Swift
-
 Tinkering With Portable DVD Players
-
 ASUS X99-Deluxe
-
 Modify Windows 8 Lock Screen
-
 Images Are The New Virus-Carriers
-
 Logitech G500s
-
 What You Can Do To Prevent Battery Loss?


