
How to Process RAW Files in Adobe Camera Raw
When you open your Raw files they often look rather flat and washed out. This is because you’re seeing the image in an unadulterated state, whereas the preview image you see on your camera’s LCD is a small JPEG of the Raw file and so tends to look better.
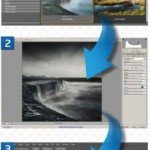
Click on the Lens Corrections tab then Profile and check the Enable Lens Profile Corrections box. A profile will be applied to correct distortion and vignetting associated with the lens you used. Next click Colour then the Remove Chromatic Aberration tab.
 Click on the Basic tab. Raw files produce the best image when the histogram is weighted to the right, but if the tone graph clips the right side, some areas of the image have no recorded detail. Click the red triangle above the histogram to show the areas that are overexposed as red.
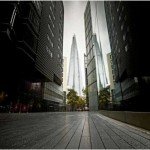
The clipped highlights are mainly in the sky, which is quite common when shooting landscapes. To recover the clipped highlights, pull the Highlight slider to the left a little. Don’t overdo this though as it will reduce contrast in the image and make it look flat.
Click on the Tone Curve tab to see sliders for Highlights, Lights, Darks and Shadows. Adjusting the sliders changes the contrast of the image, which you can do to taste. Alternatively, click on Point so you can drag the curve itself, or apply preset curves for Medium and Strong contrast .
Click on Basic again and adjust the White Balance. I normally shoot in Auto White Balance (AWB) but you can change this using any of the presets in the dropdown window or manually adjust white balance to taste using the Colour Temperature slider. I rarely touch the Tint slider.
There are two sliders in the Basic menu that you can use to adjust colour strength: Vibrance and Saturation. Vibrance is more subtle, as it affect s lower-saturated colours and leaves those that are already deeply saturated alone, so I prefer it over Saturation.
Another handy slider is Clarity, which adds depth to an image by increasing local contrast. Zoom in to 100% when using it, increase the level until halos appear near the edge details then reduce it slightly. Or apply at a low level to give the image an extra boost .
Raw files need sharpening to optimise image quality. I tend to use the default sharpening settings in ACR as I find they work fine, though you can turn them off and apply sharpening later using the software such as Sharpener Pro 3, part of the Nik Collection.
The final stage is to click Open Image then save it as a 16-bit Tiff file. You can then make further adjustments and corrections in Lightroom or Photoshop such as removing sensor blemishes, adding a graduated filter effect to the sky, converting to black & white, and so on.
You May Want to See :
-
 Adobe announces major Photoshop and Lightroom CC upgrade
-
 Manage Your Photos From Capture to Output in Three Stages
-
 Simple way to remove object inside picture using Adobe Photoshop
-
 Make a Photo Look Old
-
 How to Invert Image In Photoshop Lightroom
-
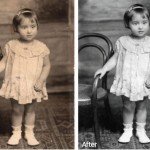 Repair Old Photo and Image Using Photoshop Elements 12
-
 Reveal everything with shadows and highlights using Photoshop
-
 Nikon D5500
-
 Create A 3D Chess Set with Photoshop
-
 Create A Seamlessly Repeating Pattern
-
 Create Geometry Effects Photoshop
-
 Best way to light a chocolate scene
-
 Blend faces together
-
 Sony releases RX100 IV and RX10 II
-
 Sigma Designs One Lens in Two Versions
-
 Lockcircle Camera Professional Body Cap
-
 Sony to debut interchangeable lenses
-
 What’s New in Adobe Lightroom 6 ?
-
 Kernel for Outlook PST Repair
-
 Change Android Screen’s Colour Temprature
-
 Images Are The New Virus-Carriers


