
Remove Tattoos Using Photoshop Elements
Everybody knows that tattoos are permanent, but what if you could wipe them off whenever you liked? It’s just another impossibility that Photoshop Elements can make reality. Tattoo removal relies on the usual touch-up techniques you apply to any kind of image, but there’s an extra need to be subtle; one false move can make skin look harsh, or make the lighting on the body look unnatural.
There are so many techniques that can remove a tattoo, and it all depends on the subject’s skin and how much un-inked skin is showing in the picture. The Clone Stamp is great for reassigning patches of a subject’s body somewhere else, but the Brush tool is much more useful in smaller areas. There’s nothing to stop you combining all three of these techniques for the ultimate edit, either. Which technique is right for you, though? Read on and learn how to erase a tattoo you might regret.

Start Image
- Eyedrop colour
Firstly, accustom yourself to the Eyedropper tool; this is one of your most trusted companions when it comes to big brushing projects. Click on the little icon on the left-hand side and use it to pick a colour close to where you want to paint over.
-
Select the Brush
Now go to the Brush tool. We’re going to need a soft brush with 100% Opacity; if we were cloning we’d pick a low Opacity so that we wouldn’t duplicate patches of skin, but as we brush, we’re creating blocks of original colour.
-
Brush slowly and carefully
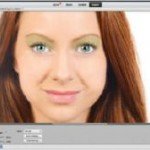
Create a new layer, just to be on the safe side, and brush over the tattoo. Eyedrop new colours by Alt/Opt-clicking, and just brush over the tattoo with the colours you select. Take it slowly to start with, and just brush around the edges.
-
Brush some more
Now, brush over the whole tattoo. Blotchiness is inevitable at this stage so don’t worry too much, but just try and pick colours close to the skin’s natural colour to paint over the top of the subject. Use the [ and ] keys to alter brush size.
-
Keep brushing
Create another new layer and pick a slightly bigger brush (we went for 300px). Apply this colour all over by using the same Eyedropper and Brush technique that you’ve been doing this far, until the skin looks smooth and natural.
- Add soft focus
To give an overall finish, apply a gentle soft focus to the picture. Do this by merging all your layers (Cmd/Ctrl+Alt/Opt+Shift+E) and duplicating your layer. Set the blend mode to Screen and then head to Filter>Blur>Gaussian Blur and apply a blur of 10-12px.

You May Want to See :
-
 Create A Seamlessly Repeating Pattern
-
 Draw With the Pen Tool
-
 Simple way to remove object inside picture using Adobe Photoshop
-
 Repair Old Photo and Image Using Photoshop Elements 12
-
 Blend faces together
-
 Melting Effect with Liquify Filter
-
 How to Invert Image In Photoshop Lightroom
-
 Create A 3D Chess Set with Photoshop
-
 Create Shiny Metallic Effect Using Photoshop
-
 Manage Your Photos From Capture to Output in Three Stages
-
 Apply Coloured Eye Shadow
-
 Create Geometry Effects Photoshop
-
 Laser in Tattoo Removal
-
 Reveal everything with shadows and highlights using Photoshop
-
 How to Process RAW Files in Adobe Camera Raw
-
 Make a Photo Look Old
-
 Best way to light a chocolate scene
-
 Add Folders and Other Objects to the Start Screen
-
 Remove Components From Circuit Board
-
 Asus Transformer Book Trio TX201LA
-
 Substance Painter