
Tweak Windows 8 Start Screen
The Microsoft Windows 8 Start screen is eminently guideable. here is how to bend it to your will.
The Start screen is the most important location in all of Microsoft Windows 8. Even if you mostly use Desktop applications like Office, you will still spend enough time there. it is command central, and also the place you are automatically sent to when you log into Windows. (Unless you tweak your windows, which lets you head directly to the Desktop instead.)
Here is a handful of guides that will help you get the Start screen working exactly the way you want it to.
Add and Remove Tiles
The applications you see when you log into the Start screen are probably not the applications you want to see there. No worries: it is a breeze to add and remove tiles from the Start screen. First a little background about which applications show up on the Start screen.
Not all application appears there; there are plenty of others buried on your computer that do not show up. Exactly why some applications appear and others do not is a bit of a mystery, but in general, the applications there are the ones you use constantly, or that Microsoft thinks you will use regularly, or, more likely, wants you to use regularly.
Say there is an application whose tile you want to remove from the Start screen. Simply rightclick an application and choose “Unpin from Start” from the menu that appears at the bottom of the screen. You can choose multiple applications this way and remove them in one fell swoop.
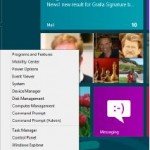
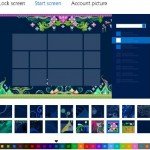
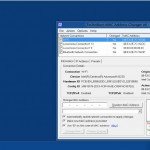
Hint: You can also use a keyboard to choose an application to remove (See Image Below). Get to it by using the arrow keys, and when you are there, press the space bar. If you are using a tablet, drag down on the tile to choose it.

Selecting an app to remove from the Start screen
Adding tiles takes a little more work, but it is still quite easy. If you know the name of the application you want to add, when you are on the Start screen, type its name. you are sent to the search screen, with the application on the left part of the screen. Right-click it, and from the menu that appears at the bottom of the screen, choose “Pin To Start.”
Tip: If you search for a Desktop application and right-click it, you may also pin it to the Taskbar from the menu that appears. If it is already pinned to the Taskbar, you can unpin it.
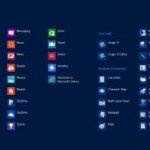
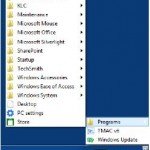
If you are not sure which application you want to pin and want to see what’s available, you can see a number of every application you have (See image below). Hit Windows key+Z, choose the “All applications” button, and you will see every application on your computer. Then choose it and add it as outlined in this guide.

Seeing all the apps on your computer
Hint: To add a Desktop application to the Start screen, see guide about, Enable Desktop applications to Show up on the Start Screen.
Customize Tiles
When you right-click an application to pin it to the Start screen, you will notice you have many more choices than just pinning it. The alternatives you get vary according to the application you choose. here is the list and what each does: • Pin to Start. You already know all about this one. • Unpin from Start. If the tile’s pinned to the Start screen, you can unpin it.
- Pin to Taskbar.
You know this one from the tip earlier in this guide. - Unpin from Taskbar.
Simple and straightforward: it does what it says. - Uninstall.
Uninstalls the application. - Larger/Smaller.
Tiles in the Start screen are either large or small; this selection makes a small tile larger, or a large tile smaller. - Turn live tile on/off.
Live tiles grab information from the Internet and display that information right on the tile. For example, the Mail application displays the number of email messages in your inbox, and also displays the sender and basic information from each. If you do not want that tile to be live like that, turn it off. If you come across a live tile that is not on, you can turn it on from here. - Clear selection.
If you choose more than one tile, the Clear selection option appears, and most other options go away. selecting this clears every application you have selected, not just the last one.
You May Want to See :
-
 Force Desktop applications to Show up on the Start Screen
-
 Put a Tile to Computer on the Start Screen
-
 Enable the Microsoft Windows 8 All applications Screen
-
 Add Folders and Other Objects to the Start Screen
-
 Bring Back the Quick Launch Toolbar to the Desktop
-
 Run the Desktop and Window 8 Native applications Side by Side
-
 Create an Application Folder for Quick Launches on the Desktop and the Start Screen
-
 Use Your Own Image for Your User Account Windows 8
-
 Use the Built-In Mini Start Menu Windows 8
-
 Customize Tile Groups and Start Screen Theme Windows 8
-
 Run Microsoft Windows 8 Native applications Side by Side
-
 Enable Start Menu for Windows 8 Without Using Software
-
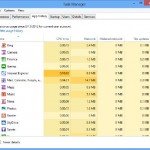 Use the Task Manager to keep track of Application Use
-
 Change Folders in the Open Dialog Box
-
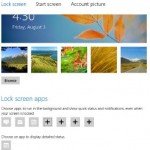 Modify Windows 8 Lock Screen
-
 Make the Desktop More Tablet-Friendly
-
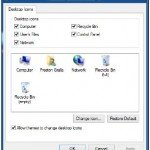 Put Helpful Navigation Icons on the Desktop
-
 Speed Up Windows 8 Boot Time
-
 Disable / Bypass Windows 8 Lock Screen
-
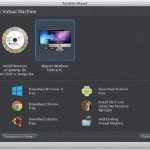 Installing and Running Windows on a Mac
-
 Controlling Live Tile Behavior Windows 8


